As an eBay Partner, I may be compensated if you make a purchase.
A few months ago I wrote a guide to bypassing the AT&T fiber modem using a UniFi USG, and I’ve since upgraded to the UniFi Dream Machine Pro and wanted to write an updated guide since the process is a bit different.
To recap, the AT&T router/gateway has no true bridge mode, so it’s incompatible with the UDM Pro’s DHCP and my current home network. I’d end up in a double NAT situation unless I let AT&T’s modem handle everything like DHCP, firewall, port forwarding, etc. Not ideal!
Unfortunately the RG (that’s what AT&T calls the modem) authenticates with the AT&T fiber network with a special hard-coded certificate unique to each modem, so you can’t just throw the RG into a bin and plug your USG directly into the fiber ONT. It’ll fail the handshake and never go online. Unless you follow this guide. 🙂
The steps for the UDM Pro and the USG are slightly different, so here’s my new guide that I’ve cobbled together from other online sources.
Before you start
First we need a rooted NVG589 modem. AT&T may not have supplied you with this model (I was given a Pace 5268AC), but they can be found on eBay sometimes. Follow this guide that details rooting the device and extracting the needed certificate files.
OR you can do what I did and purchase the rooted files. For about $40 I was able to instantly move to the next step without waiting for a modem to ship and bumbling through rooting the device. A seller called maczrool on eBay sells unique rooted certificates and seems to have a lot of them.
In order to move forward you need the following files from your rooted RG (or eBay):
- CA_XXXXXX-XXXXXXXXXXXXXX.pem
- Client_XXXXXX-XXXXXXXXXXXXXX.pem
- PrivateKey_PKCS1_XXXXXX-XXXXXXXXXXXXXX.pem
- wpa_supplicant.conf
- The MAC address of the rooted device (printed on the back of the RG, or included with the files from eBay)
- The IP address, username, and password of your UniFi controller. In this guide I’m using
10.0.1.5for the IP andadminfor the username.
Instructions
Step 1
First we need to enable SSH access to the UDMP (UniFi Dream Machine Pro), which is configured differently from other UniFi products.

First navigate to the IP or hostname of your UDMP (ex: 192.168.1.1)
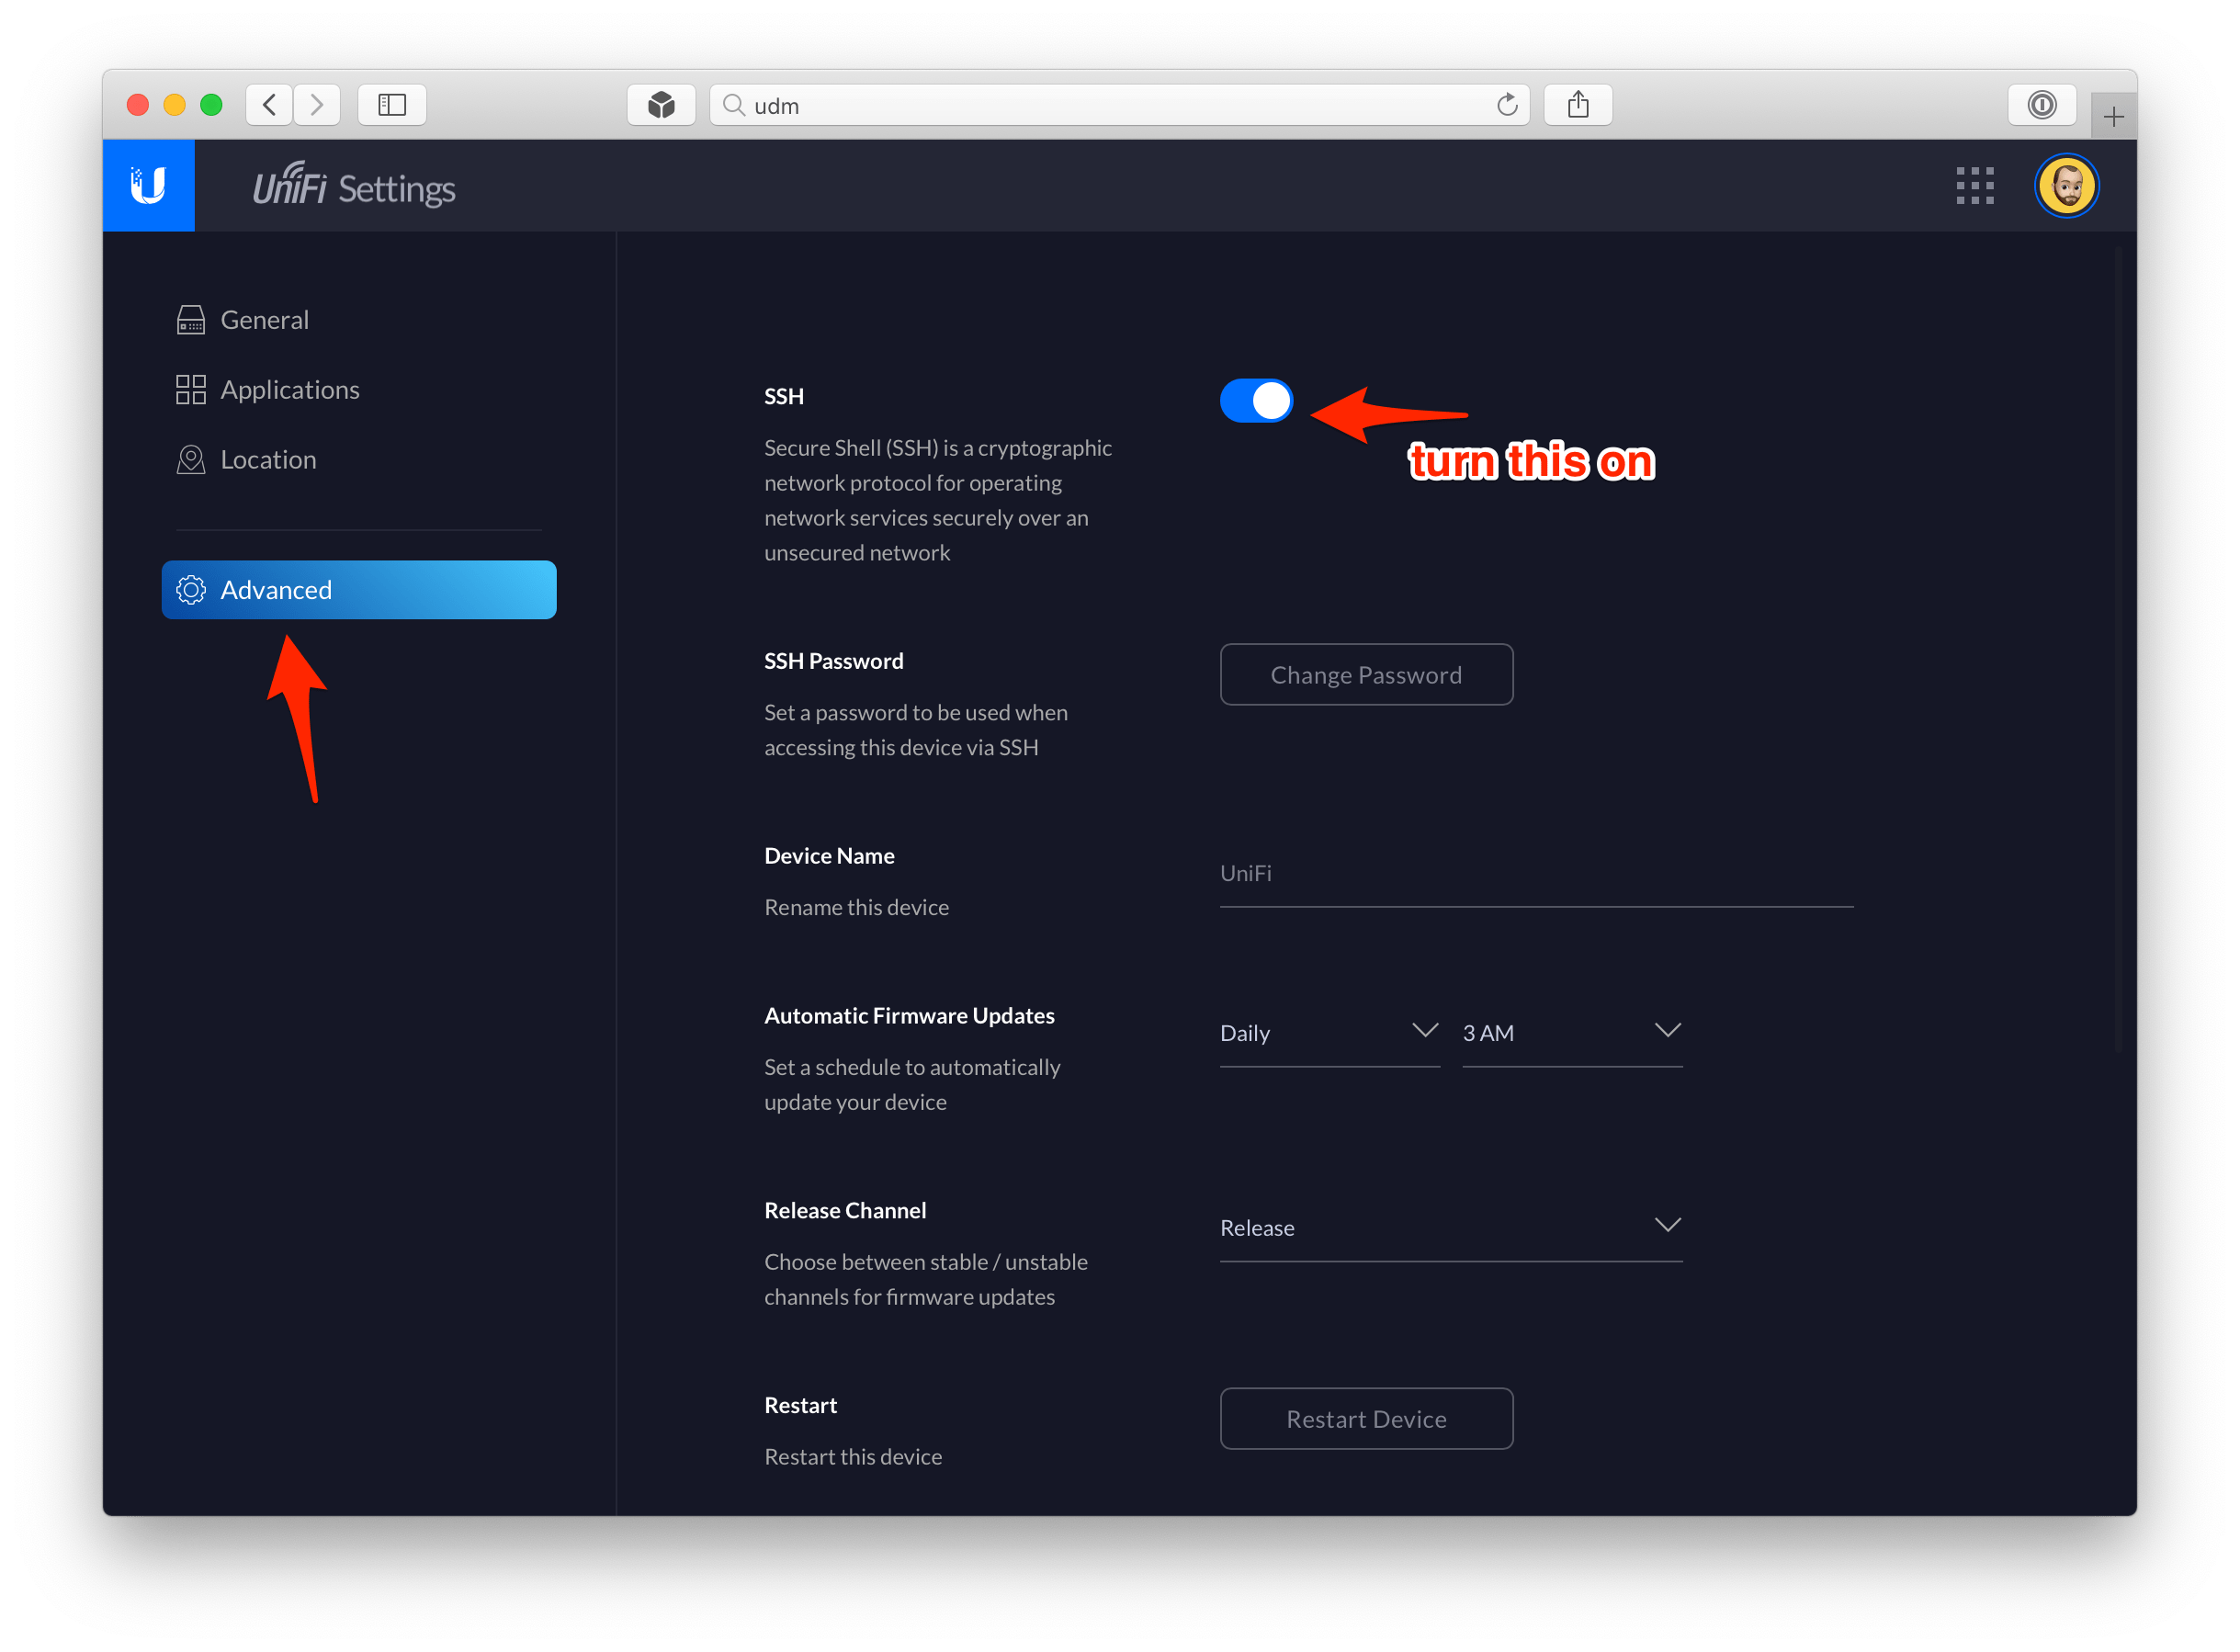
Then go to Advanced and toggle SSH on. You will also need to set a SSH password, so do that next and hit Confirm.
Step 2
Open a terminal window and copy your 4 certificate files to the UDMP. Replace 192.168.1.1 with your UDMP’s IP address. Your username is root and the password is the password you set in Step 1.
# switch to the directory where you saved your files
$ cd /path/to/*.pem
# copy the PEM files to the UDMP using SCP
$ scp ./*.pem root@192.168.1.1:/tmp/
# copy wpa_supplicant.conf to the UDMP using SCP
$ scp ./wpa_supplicant.conf root@192.168.1.1:/tmp/
Next SSH into your UDMP, and move the files to their final place.
# ssh into the UDMP
$ ssh root@192.168.1.1
# create the certificate directory
mkdir /mnt/data/podman/wpa_supplicant/
# copy files into the new directory
$ cp -arfv /tmp/*pem /tmp/wpa_supplicant.conf /mnt/data/podman/wpa_supplicant/
Step 3
We need to modify the wpa_supplicant.conf file with the correct file paths of your .pem certificate files. Run each of these commands only once!
$ sed -i 's,ca_cert=",ca_cert="/etc/wpa_supplicant/conf/,g' /mnt/data/podman/wpa_supplicant/wpa_supplicant.conf
$ sed -i 's,client_cert=",client_cert="/etc/wpa_supplicant/conf/,g' /mnt/data/podman/wpa_supplicant/wpa_supplicant.conf
$ sed -i 's,private_key=",private_key="/etc/wpa_supplicant/conf/,g' /mnt/data/podman/wpa_supplicant/wpa_supplicant.conf
Step 4
We need to install the wpa_supplicant-udmpro Docker image by pbrah, which will authenticate requests to the AT&T fiber network. There are instructions in the GitHub repo, and I am reproducing them here with some added detail.
Assuming your UDMP is connected to the internet via the RG and that your RG is attached to Port 8 (the ethernet WAN port, not the SFP+ port), run this command to download the Docker image:
$ podman run --privileged --network=host --name=wpa_supplicant-udmpro -v /mnt/data/podman/wpa_supplicant/:/etc/wpa_supplicant/conf/ --log-driver=k8s-file --restart always -d -ti pbrah/wpa_supplicant-udmpro:v1.0 -Dwired -ieth8 -c/etc/wpa_supplicant/conf/wpa_supplicant.conf
Only if your RG is attached to Port 10 (the SFP+ WAN port) run this command instead:
$ podman run --privileged --network=host --name=wpa_supplicant-udmpro -v /mnt/data/podman/wpa_supplicant/:/etc/wpa_supplicant/conf/ --log-driver=k8s-file --restart always -d -ti pbrah/wpa_supplicant-udmpro:v1.0 -Dwired -ieth10 -c/etc/wpa_supplicant/conf/wpa_supplicant.conf
Step 5
We’re in the home stretch! We need to make sure the Docker image runs every time the UDMP is rebooted. Fortunately there’s a UDMP Boot Script on GitHub that we can use for exactly this purpose.
SSH into the UDMP and download the script:
# SSH into your UDM
$ ssh root@192.168.1.1
# start UniFi OS shell
$ unifi-os shell
# download udm-boot_1.0.1-1_all.deb and install it
$ curl -L https://udm-boot.boostchicken.dev -o udm-boot_1.0.4_all.deb
$ dpkg -i udm-boot_1.0.4_all.deb
$ exit
We need to create a small shell script to finish up.
$ nano /mnt/data/on_boot.d/10-wpa_supplicant.sh
Copy and paste this snippet into nano:
#!/bin/sh

podman start wpa_supplicant-udmpro
then press Ctrl O then Ctrl X to save and close.
We need to make the script we just created executable, too.
chmod +x /mnt/data/on_boot.d/10-wpa_supplicant.sh
Step 6
Now reboot your UDMP and plug the ethernet cable from your fiber ONT directly into the WAN port of your UDMP. It’ll take a few minutes to boot up. Once it’s back online, you should have internet connectivity! You can also check it’s working by SSHing back into the UDM and viewing the Docker logs:
$ ssh root@192.168.1.1
$ podman logs -f wpa_supplicant-udmpro
If you see output like this, then it’s definitely working!
...
eth8: CTRL-EVENT-EAP-PEER-CERT depth=0 subject='/C=US/ST=Michigan/L=Southfield/O=ATT Services Inc/OU=OCATS/CN=aut03pltnca.pltnca.sbcglobal.net' hash=XXXXXXXXXXXXXXXXXXXXXXXXXXXXXXXXXXXXXXXXXXXXXXXXXXXXXXXXXXXXXXXX
eth8: CTRL-EVENT-EAP-PEER-ALT depth=0 DNS:aut03pltnca.pltnca.sbcglobal.net
eth8: CTRL-EVENT-EAP-SUCCESS EAP authentication completed successfully
...
Press Ctrl C to close the log viewer.
Additional resources
- I also have a guide for doing this on the UniFi USG
- wpa_supplicant-udmpro and udm-utilities on GitHub - most of this guide is adapted from their great work!
- Guide for rooting NVG510 and NVG589
- maczrool on eBay (I bought my certs from him)