Update 2020-08-05: I’ve compiled a new guide detailing how you can also do this with a UniFi Dream Machine Pro, which you can find here.
As an eBay Partner, I may be compensated if you make a purchase.
Last week I discovered that AT&T had run fiber optic cable in my neighborhood. It was a no-brainer for me to switch from Comcast’s ‘gigabit’ (1000/40) service to AT&T’s symmetrical (1000/1000) fiber to the home. $10 cheaper, no less!
The onsite tech did an amazing job running a dedicated fiber line right into my garage and mounting the ONT right above my lab. And I’ve got near line speeds (~946 symmetrical on Ethernet), so everything is perfect.
…except the modem. Look at this chonker! It has its own ZIP code! And they somehow couldn’t fit the power supply inside the mammoth plastic shell, so it has a power brick too.
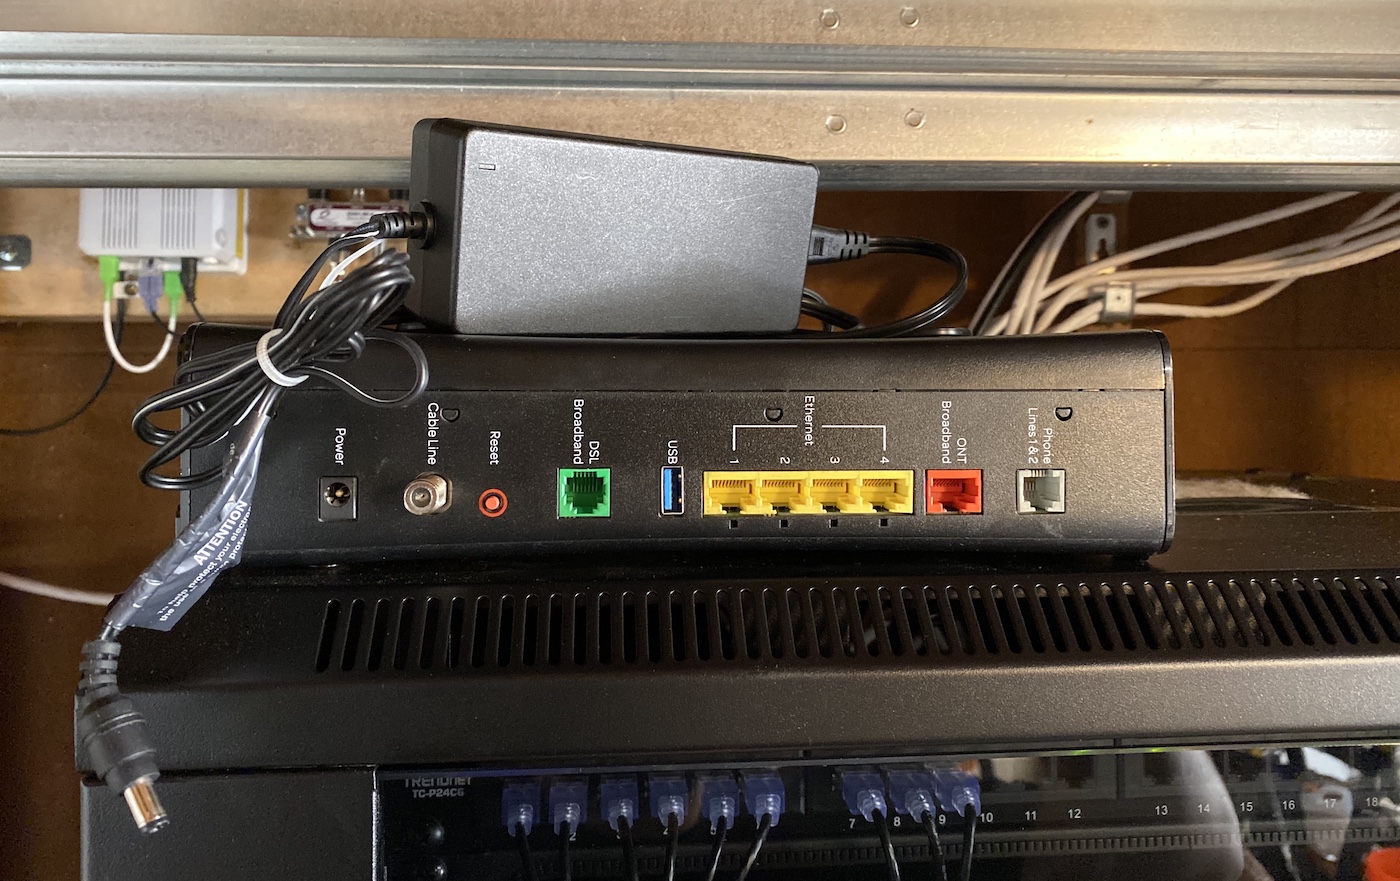
Also, it has no true bridge mode, so it’s incompatible with my UniFi Security Gateway and current home network. I’d end up in a double NAT situation unless I let AT&T’s modem handle DHCP, firewall, port forwarding, etc. Not ideal!
Unfortunately the RG (that’s what AT&T calls the modem) authenticates with the AT&T Fiber network with a special hard-coded certificate unique to each modem, so you can’t just throw the RG into a bin and plug your USG directly into the fiber ONT. It’ll fail the handshake and never go online. Or can you?
I tried two methods, and happily landed on the latter. This guide is a consolidation of a smattering of guides I found online.
Method 1: EAP Proxy
This method requires that you plug the RG into the WAN2/LAN2 port on the USG, and configures the USG to forward authentication packets between the RG and ONT. This bypasses the RG’s NAT and DHCP letting you run your network normally, as if there were a true bridge mode from AT&T.
This method is less desirable because it requires the huge bulky RG to be plugged in at all times.
I won’t go into detail on this method because the complete guide lives on Taylor Smith’s blog.
Method 2: wpa_supplicant
This method is vastly preferred because you can connect the USG directly to the ONT without needing the RG at all. It’s more work though—-you need the private key from a working RG (model NVG589) obtained by rooting the device.
Then you install the wpa_supplicant on the USG and instruct it to use the .pem files you obtained from the sacrificial RG.
This guide is adapted from a DSLReports forum thread on this topic. This guide may also work with the Unifi Security Gateway Pro and the Dream Machine / Dream Machine Pro but I haven’t personally tested it.
Instructions
Step 1
First we need a rooted NVG589 modem. AT&T may not have supplied you with this model (I was given a Pace 5268AC), but they can be found on eBay sometimes. Follow this guide that details rooting the device and extracting the needed certificate files.
OR you can do what I did and purchase the rooted files. For about $40 I was able to instantly move to the next step without waiting for a modem to ship and bumbling through rooting the device. A seller called maczrool on eBay sells unique rooted certificates and seems to have a lot of them.
In order to move forward you need the following files from your rooted RG (or eBay):
- CA_XXXXXX-XXXXXXXXXXXXXX.pem
- Client_XXXXXX-XXXXXXXXXXXXXX.pem
- PrivateKey_PKCS1_XXXXXX-XXXXXXXXXXXXXX.pem
- wpa_supplicant.conf
- The MAC address of the rooted device (printed on the back of the RG, or included with the files from eBay)
- The IP address, username, and password of your UniFi controller. In this guide I’m using
10.0.1.5for the IP andadminfor the username.
Step 2
Download wpa_supplicant from the DSLReports forum, then copy the file to a writeable folder on your USG.
# switch to the directory where you downloaded wpa_supplicant
$ cd /path/to/wpa_supplicant
# copy wpa_supplicant to the USG using SCP
$ scp ./wpa_supplicant admin@10.0.1.1:/config/scripts/post-config.d/
SSH into your USG using the username/password you use to log into your UniFi Controller software. I use SSH keys in UniFi, so no password needed :)
$ ssh admin@10.0.1.1
# move wpa_supplicant to the right folder
$ sudo mv /config/scripts/post-config.d/wpa_supplicant /config/scripts/
Step 3
Create a wpa_supplicant.sh script using the code below.
cd /config/scripts/post-config.d/
nano wpa_supplicant.sh
This will open a text editor in your terminal called nano. Paste the below script into your terminal.
#!/usr/bin/env bash

# Start EAP-TLS on eth0
# Check if already running to avoid multiple instances
# Created by AntiTrust on DSLReports.com on May 15, 2019
# https://www.dslreports.com/forum/r32391619-

IF_WAN=eth0
PROCESS_NAME=wpa_supplicant
PROCESS_PATH=/config/scripts/wpa_supplicant
PROCESS_COUNT=$(ps -A | grep $PROCESS_NAME | egrep -v "grep|$(basename $0)" | grep -c $PROCESS_NAME)

if [ $PROCESS_COUNT = 0 ] && [ -x $PROCESS_PATH ]; then
  $PROCESS_PATH -s -B -Dwired -i$IF_WAN -c/config/scripts/wpa_supplicant.conf -g/var/run/wpa_supplicant.ctrl -P/var/run/wpa_supplicant.pid
fi
To save the file, press Ctrl O then Ctrl X. Now set appropriate file permissions.
$ chmod +x /config/scripts/wpa_supplicant
$ chmod +x /config/scripts/post-config.d/wpa_supplicant.sh
Step 4
Back on your local terminal window, copy your files from Step 1 to your USG.
# switch to the directory where you saved your files
$ cd /path/to/*.pem
# copy the PEM files to the USG using SCP
$ scp ./*.pem admin@10.0.1.1:/config/scripts/post-config.d/
# copy wpa_supplicant.conf to the USG using SCP
$ scp ./wpa_supplicant.conf admin@10.0.1.1:/config/scripts/post-config.d/
And in the terminal window where you’re SSH’ed into your USG, move the files to the right places.
# move PEM files
$ sudo mv /config/scripts/post-config.d/*.pem /config/auth/
# make PEM files read-only
$ sudo chmod -R 0600 /config/auth
# move conf file
$ sudo mv /config/scripts/post-config.d/wpa_supplicant.conf /config/scripts/
Step 5
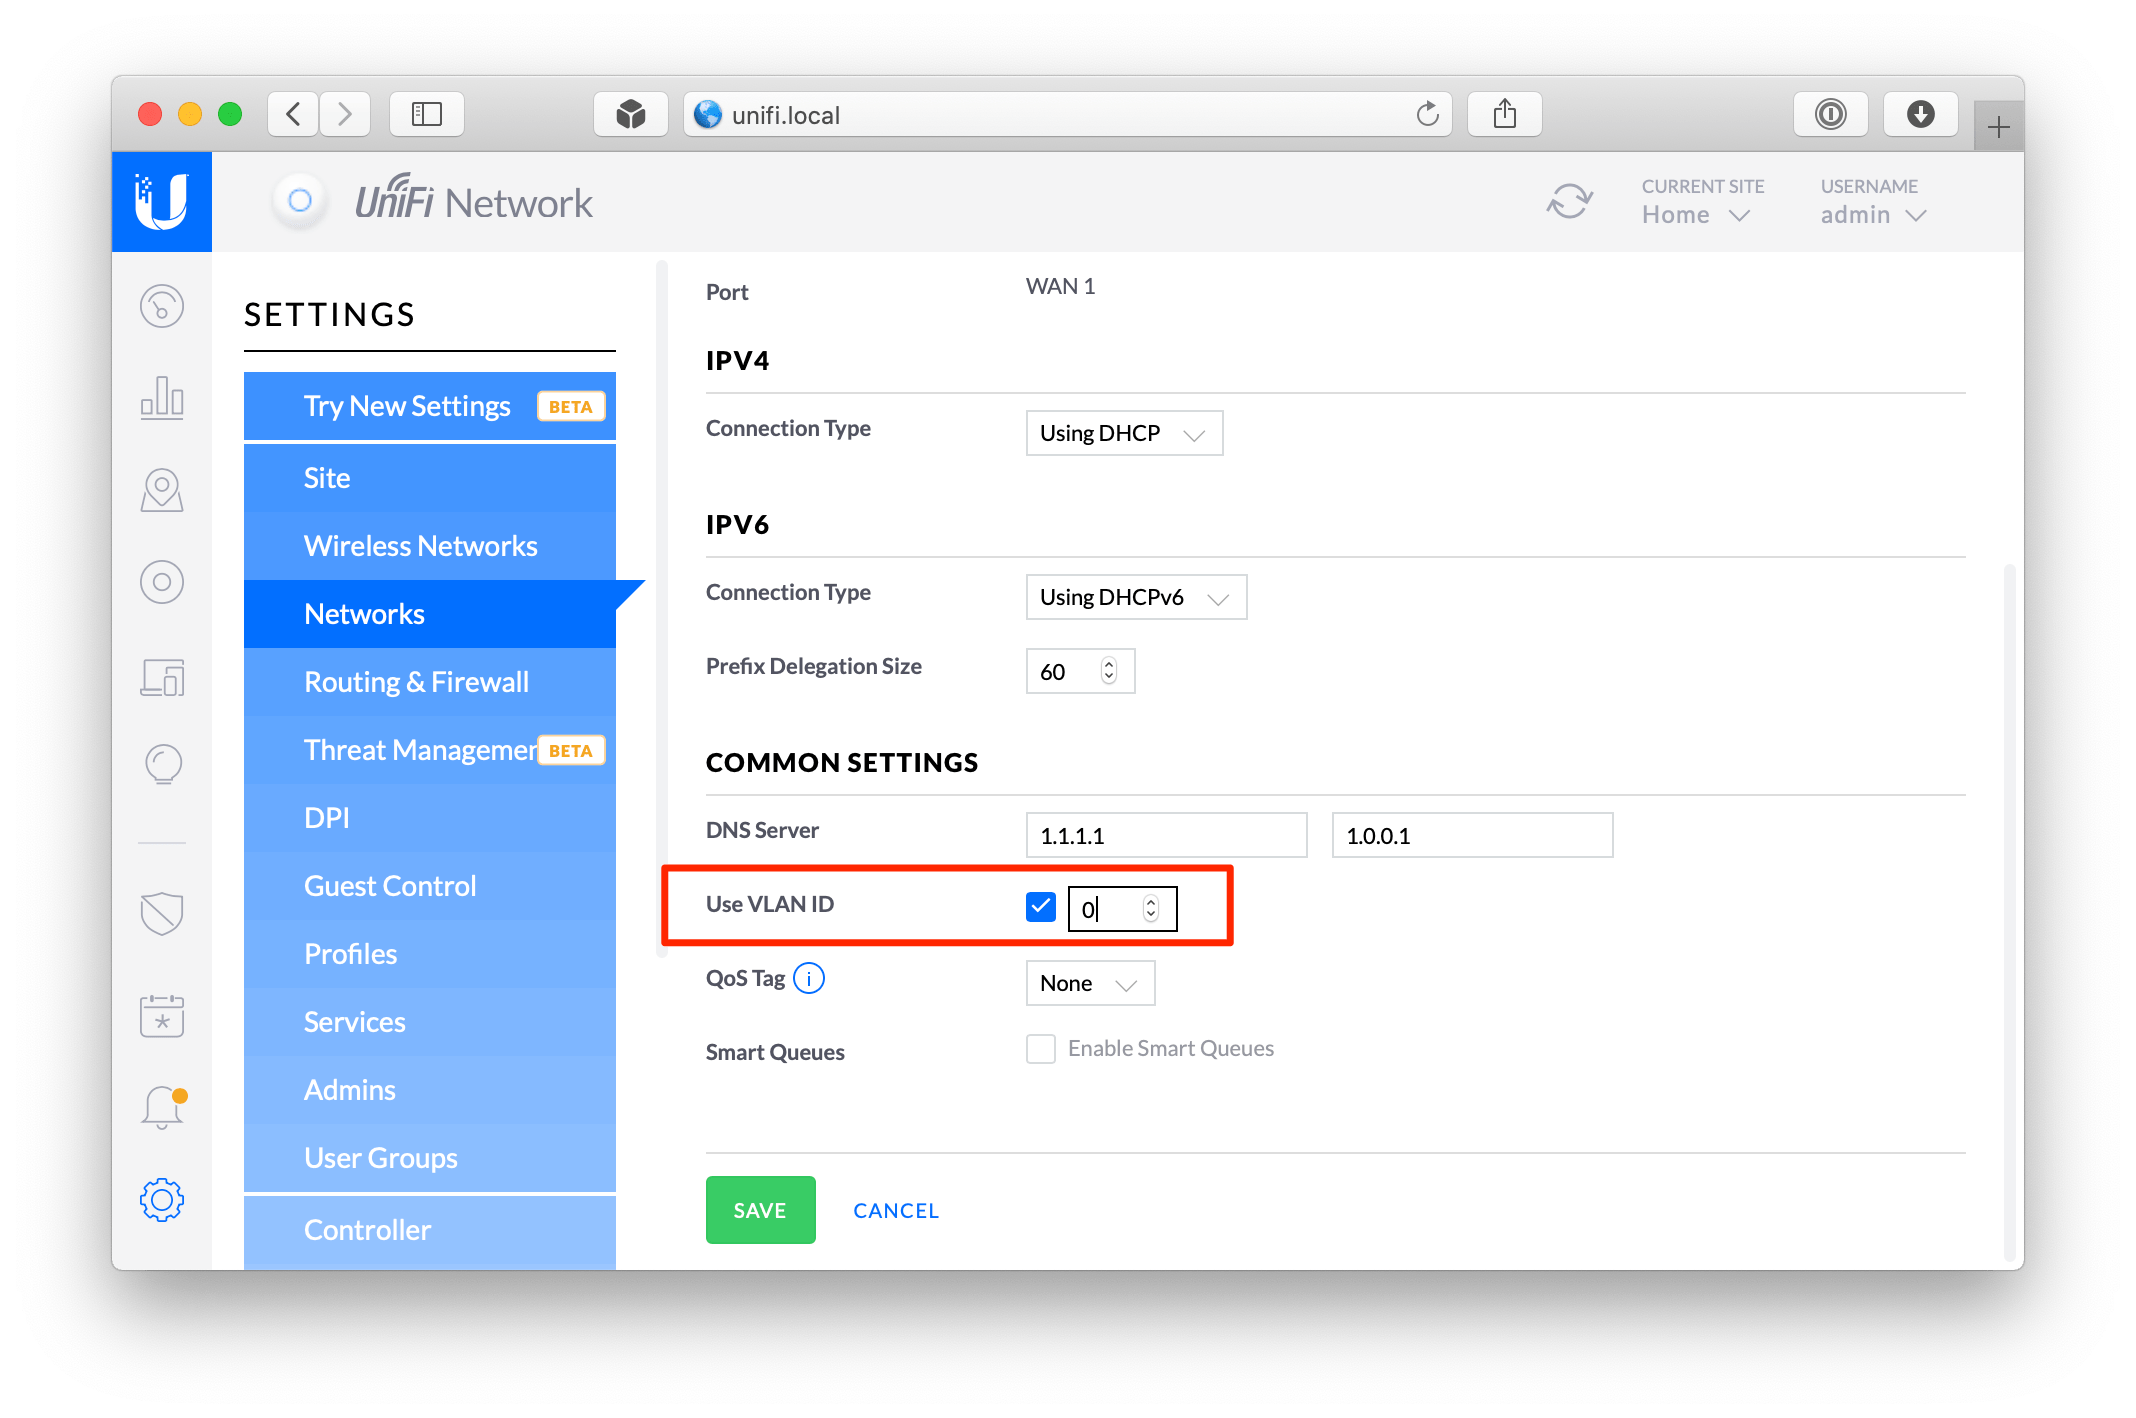
Log into your UniFi controller web interface. Go to Settings › Networks › WAN › Common Settings and enable Use VLAN ID and set it to 0
Step 6
We need to trick the AT&T Fiber network into thinking your USG is actually the RG. To do that, we’re going to spoof the USG’s MAC address to match the RG’s. The MAC address spoof feature isn’t present in the UniFi controller web interface, so we need to edit the config.gateway.json file directly.
$ ssh admin@10.0.1.5
$ cd /usr/lib/unifi/data/sites/default/
$ nano config.gateway.json
It should open a blank file. If it’s not blank, then you probably already know what you’re doing 🙂 Paste the following code into nano.
{
	"interfaces": {
		"ethernet": {
			"eth0": {
				"mac": "XX:XX:XX:XX:XX:XX"
			}
		}
	}
}
To save the file, press Ctrl O then Ctrl X. Now set appropriate file permissions.
$ chown unifi:unifi config.gateway.json
Step 7
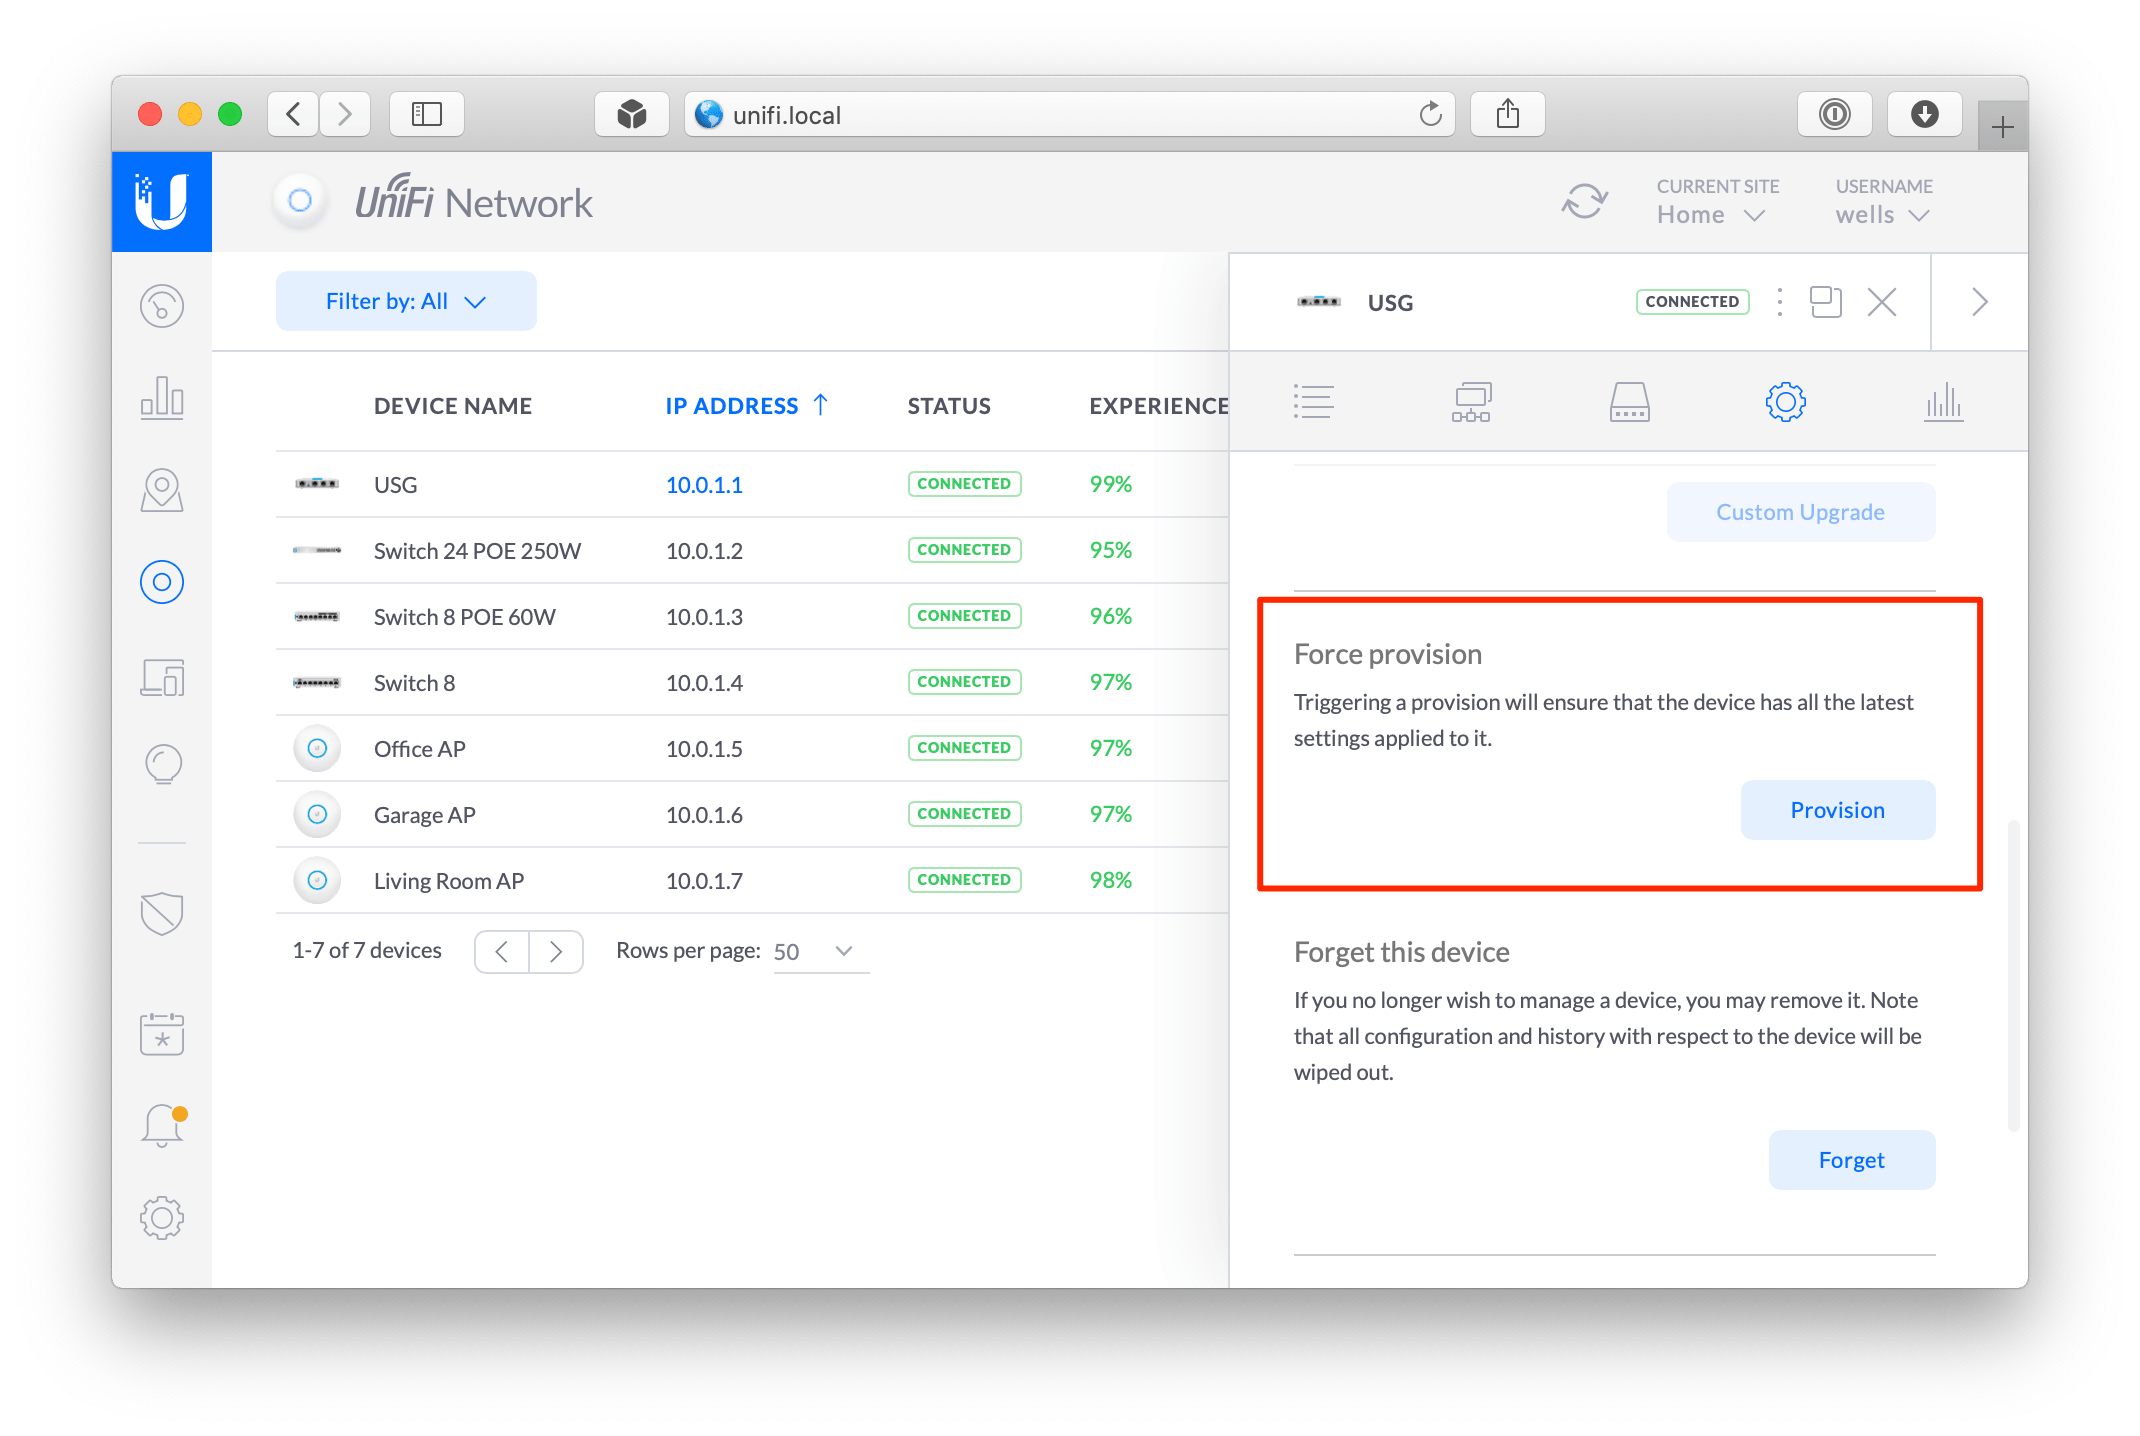
We’re in the home stretch! In the UniFi Controller web interface, go to Devices › USG › Config › Manage Device and click the Provision button under Force Provision.
While you’re waiting for your USG to provision, unplug the RG from the ONT and USG, and plug the Ethernet cable coming out of the ONT into the WAN port on your USG.
After about 5 minutes, reboot your USG (unplug and plug it back in). Once it’s back online, try to browse the Web. It should work! If it does, go ahead and throw your thicc boi RG in a storage bin or something.
You can confirm it’s working by SSHing into the USG.
$ ssh admin@10.0.1.1 # the IP of your USG
$ tail -n 100 -f /var/log/messages | grep wpa_supplicant
If you see output like this, then it’s definitely working!
...
Mar  1 17:24:18 USG wpa_supplicant[5150]: eth0: CTRL-EVENT-EAP-PEER-CERT depth=0 subject='/C=US/ST=Michigan/L=Southfield/O=ATT Services Inc/OU=OCATS/CN=aut03pltnca.pltnca.sbcglobal.net' hash=XXXXXXXXXXXXXXXXXXXXXXXXXXXXXXXXXXXXXXXXXXXXXXXXXXXXXXXXXXXXXXXX
Mar  1 17:24:18 USG wpa_supplicant[5150]: eth0: CTRL-EVENT-EAP-PEER-ALT depth=0 DNS:aut03pltnca.pltnca.sbcglobal.net
Mar  1 17:24:57 USG wpa_supplicant[5150]: eth0: CTRL-EVENT-EAP-SUCCESS EAP authentication completed successfully
Mar  1 17:24:57 USG wpa_supplicant[5150]: eth0: CTRL-EVENT-CONNECTED - Connection to XX:XX:XX:XX:XX:XX completed [id=0 id_str=]
...
Additional resources
- AntiTrust’s guide on DSLReports - most of this guide is adapted from his great work!
- Guide for rooting NVG510 and NVG589
- maczrool on eBay (I bought my certs from him)
- DSLReports forum thread where I learned that this actually works on USG (previously it seemed it only worked on EdgeRouters and possibly UDM via Docker)