AT&T Fiber on UniFi · Mar 2020 Bypassing the AT&T fiber modem with a UniFi Dream Machine Pro.
Updated
AT&T Fiber comes with a gateway, which AT&T calls the RG, and it is big: so big that its power supply lives in a separate brick. It also has no true bridge mode. Behind it, a UniFi gateway ends up in a double NAT, unless the RG is left to handle DHCP, the firewall and port forwarding.
The RG can’t simply be unplugged, either. It signs in to AT&T’s network with a certificate that is unique to each gateway, so a router plugged straight into the fiber fails that sign-in and never gets online. This page covers the ways around that on a UniFi gateway.
It was first written in 2020, for a UniFi Security Gateway (USG) and then a UniFi Dream Machine Pro, and updated in October 2026 for today’s UniFi gateways and AT&T’s faster fiber. The steps follow the maintained community guides linked in each section; check those for the latest details.
The supported way: IP Passthrough
AT&T says bridge mode isn’t possible on its network. Its supported option for your own router is IP Passthrough: the RG stays plugged in, but hands its public IP address straight to your UniFi gateway, so there’s no double NAT. In the RG’s settings at 192.168.1.254, under IP Passthrough, set Allocation Mode to Passthrough, Passthrough Mode to DHCPS-fixed, and the fixed MAC address to your UniFi gateway’s WAN MAC address.
That is enough for most people. The rest of this page takes the RG out entirely, which AT&T doesn’t support: keep the RG, so you can always go back to it.
Which way works on your line
AT&T runs two kinds of fiber, and each needs a different method:
- GPON, on 1 Gig plans in many areas. Usually the fiber ends in a separate small box (the ONT), and the RG plugs into it with an Ethernet cable. Your UniFi gateway can plug into that box in the RG’s place and sign in with your RG’s certificate: see On a GPON line. (If instead the fiber plugs straight into your RG, there’s no box to use. Some people have put a GPON module in their UniFi gateway instead, but that’s less established.)
- XGS-PON, on 2 Gig and faster plans, and on 1 Gig in some areas. The fiber plugs into the RG itself, so there’s no box to plug into. Instead, a small fiber module in your UniFi gateway stands in for the RG: see On an XGS-PON line.
To tell which you have: the RG’s fiber status page at 192.168.1.254 shows a wavelength of 1270 nm on XGS-PON (some newer RG firmware shows 0 there). On the fiber module itself, an orange or red latch, or a label that says “XGS-PON” or “1270”, means XGS-PON; a green latch or 1310 nm means GPON.
On a GPON line
Your UniFi gateway runs wpa_supplicant, the same sign-in program the RG uses, with your RG’s certificate. These steps follow evie-lau’s  Unifi-gateway-wpa-supplicant guide, which is kept up to date and written for UniFi OS 3 and 4. People report it working on UniFi OS 5.0, but that isn’t confirmed.
What you need
The certificate files from your own AT&T gateway. Use only your own: a set extracted from someone else’s gateway signs you in as that customer.
- BGW210 and BGW320: 0x888e/certs extracts them. It needs the gateway downgraded to older firmware and kept offline while it runs, and AT&T no longer hosts that firmware, so check any copy against the hashes in its README.
- NVG589 and NVG599: the bypassrg guide roots them and extracts the files.
Decoded, the files are:
CA_XXXXXX-XXXXXXXXXXXXXX.pemClient_XXXXXX-XXXXXXXXXXXXXX.pemPrivateKey_PKCS1_XXXXXX-XXXXXXXXXXXXXX.pemwpa_supplicant.conf, which also holds the RG’s MAC address
A UniFi gateway on UniFi OS 3 or later, such as a Dream Machine Pro or SE, a Cloud Gateway Ultra or Max, a Dream Router 7, an Express 7 or a UXG. Not the USG: it has its own steps, in the 2020 build.
Its WAN port’s name, which the commands below use. The examples use eth4; replace it with yours everywhere.
| Gateway | WAN port |
|---|---|
| UXG Lite, UniFi Express | eth1 |
| UXG Pro | eth0 (RJ45 WAN1), eth2 (SFP+ WAN2) |
| UXG Max, Cloud Gateway Ultra, Dream Router, Dream Machine | eth4 |
| Dream Machine Pro and SE | eth8 (RJ45), eth9 (SFP+) |
| Dream Router 7 | eth3 |
| Express 7 | eth1 |
Check yours on the gateway with ip -br link before you start.
1. Install wpa_supplicant
Turn on SSH in the UniFi dashboard (Settings › System › Advanced › Device Authentication sets its password) and sign in as root. Then install wpa_supplicant and check which Debian release the gateway runs:
apt update -y
apt install -y wpasupplicant
grep PRETTY_NAME /etc/os-release; openssl version
The last line matters later. UniFi OS 3 and 4 are based on Debian 11; newer releases are based on Debian 13, with OpenSSL 3.
On a Dream Router 7 or an Express 7, the version apt installs can lack the wired driver that this needs. If wpa_supplicant fails with a driver error, install the Debian packages directly instead, as in step 6, with dpkg -i *.deb.
2. Copy the certificates
On the gateway, make a folder for them:
mkdir -p /etc/wpa_supplicant/certsFrom your own computer, copy the files across:
scp *.pem root@<gateway>:/etc/wpa_supplicant/certs
scp wpa_supplicant.conf root@<gateway>:/etc/wpa_supplicant
In wpa_supplicant.conf on the gateway, give the three certificate files their full paths:
network={
        ca_cert="/etc/wpa_supplicant/certs/CA_XXXXXX-XXXXXXXXXXXXXX.pem"
        client_cert="/etc/wpa_supplicant/certs/Client_XXXXXX-XXXXXXXXXXXXXX.pem"
        ...
        private_key="/etc/wpa_supplicant/certs/PrivateKey_PKCS1_XXXXXX-XXXXXXXXXXXXXX.pem"
}
On Debian 13, also add this line above network={, outside it. AT&T’s certificates are signed with SHA-1, which OpenSSL 3 refuses by default, and without the line the sign-in fails with “ca md too weak”:
eapol_version=1
ap_scan=0
fast_reauth=1
openssl_ciphers=DEFAULT@SECLEVEL=0
network={
...
3. Set the WAN’s MAC address and VLAN
In the UniFi dashboard, go to Settings › Internet and choose your WAN:
- Turn on MAC Address Clone and enter the RG’s MAC address.
- Turn on VLAN ID and set it to
0. The internet stops until the next step works; turning VLAN ID off brings it back.
Apply, then move the Ethernet cable from the RG to your UniFi gateway’s WAN port.
4. Test it
On the gateway, using your WAN port’s name:
wpa_supplicant -i eth4 -D wired -c /etc/wpa_supplicant/wpa_supplicant.confLines like these mean it signed in. Press Ctrl-C to stop.
eth4: CTRL-EVENT-EAP-PEER-CERT depth=0 subject='/C=US/ST=Michigan/L=Southfield/O=ATT Services Inc/OU=OCATS/CN=...'
eth4: CTRL-EVENT-EAP-SUCCESS EAP authentication completed successfully
eth4: CTRL-EVENT-CONNECTED - Connection to XX:XX:XX:XX:XX:XX completed [id=0 id_str=]
If it doesn’t, check that the MAC address clone took effect.
5. Start it at boot
wpa_supplicant comes with a service for each wired port. Its config file has to be named after the port:
cd /etc/wpa_supplicant
mv wpa_supplicant.conf wpa_supplicant-wired-eth4.conf
systemctl start wpa_supplicant-wired@eth4
systemctl status wpa_supplicant-wired@eth4
systemctl enable wpa_supplicant-wired@eth4
If it starts too early after a restart, it can fail. Let it retry:
mkdir -p /etc/systemd/system/wpa_supplicant-wired@.service.d
vi /etc/systemd/system/wpa_supplicant-wired@.service.d/restart-on-failure.conf
[Unit]
# Allow up to 10 attempts within a 3 minute window
StartLimitIntervalSec=180
StartLimitBurst=10
[Service]
# Enable restarting on failure
Restart=on-failure
# Wait 10 seconds between restart attempts
RestartSec=10systemctl daemon-reload
systemctl restart wpa_supplicant-wired@eth4.service6. Keep it through firmware updates
A UniFi OS update removes wpa_supplicant, and without it there’s no internet to reinstall it from. So keep its packages on the gateway, in a folder updates have so far left alone, with a service that reinstalls them when it’s gone. Download the packages for your gateway’s Debian release, and only that one: the reinstall installs everything in the folder.
Debian 11:
mkdir -p /etc/wpa_supplicant/packages
cd /etc/wpa_supplicant/packages
wget http://security.debian.org/debian-security/pool/updates/main/w/wpa/wpasupplicant_2.9.0-21+deb11u3_arm64.deb
wget http://ftp.us.debian.org/debian/pool/main/p/pcsc-lite/libpcsclite1_1.9.1-1_arm64.deb
Debian 13:
mkdir -p /etc/wpa_supplicant/packages
cd /etc/wpa_supplicant/packages
wget http://ftp.us.debian.org/debian/pool/main/w/wpa/wpasupplicant_2.10-24_arm64.deb
wget http://ftp.us.debian.org/debian/pool/main/p/pcsc-lite/libpcsclite1_2.3.3-1_arm64.deb
Then create the service:
vi /etc/systemd/system/reinstall-wpa.service[Unit]
Description=Reinstall and start/enable wpa_supplicant
AssertPathExistsGlob=/etc/wpa_supplicant/packages/wpasupplicant*arm64.deb
AssertPathExistsGlob=/etc/wpa_supplicant/packages/libpcsclite1*arm64.deb
ConditionPathExists=!/sbin/wpa_supplicant
After=network-online.target
Requires=network-online.target
# Allow up to 10 attempts within ~300 seconds
StartLimitIntervalSec=300
StartLimitBurst=10
[Service]
Type=oneshot
ExecStartPre=/usr/bin/dpkg -Ri /etc/wpa_supplicant/packages
ExecStart=/bin/systemctl start wpa_supplicant-wired@eth4
ExecStartPost=/bin/systemctl enable wpa_supplicant-wired@eth4
Restart=on-failure
RestartSec=20
[Install]
WantedBy=multi-user.targetsystemctl daemon-reload
systemctl enable reinstall-wpa.serviceExpect the internet to drop during every UniFi OS update. If an update moves the gateway to a newer Debian release, rerun the release check from step 1, swap the cached packages for the new release’s, and add the Debian 13 line from step 2.
Known problems
- The connection can drop about every 14 days and come back at the next DHCP renewal, around 30 minutes later. It’s an open issue, with workarounds in the thread.
- On a Cloud Gateway Fiber or UXG Fiber, the dashboard’s VLAN 0 setting broke the connection at boot; running wpa_supplicant on
eth4.0instead fixed it. - Turn SSH off again once it works.
On an XGS-PON line
Here a small SFP+ ONT module plugs into your UniFi gateway’s SFP+ port and takes the RG’s place on the fiber, using the serial number and settings from your own RG’s label and status page. The usual one is the WAS-110, running the 8311 community’s firmware.  pon.wiki has step-by-step guides for the BGW320-500 and 505, the BGW620-700 and the CGW452-400.
A few things to know before buying one:
- Only for XGS-PON. A module like this does nothing on a GPON line.
- Get the connector that matches your fiber, SC/APC on AT&T’s, and never mix APC and UPC.
- The modules run hot, and pon.wiki says above 60 °C shortens their life. Some other modules’ firmware is known to brick them; the WAS-110 is the one pon.wiki recommends.
- Reports say no certificate is needed on XGS-PON, and pon.wiki’s guides don’t use one, but that isn’t settled.
- Keep the RG in service for a week or two, until AT&T closes the installation, and keep it as a fallback after that.
- UniFi’s dashboard can’t reach the module’s own settings page; pon.wiki explains how to over SSH.
The 2020 build
These are the original steps, from 2020, kept for anyone still running a USG. They no longer work on current gear:
- UniFi Network 10.6 is the last version that can manage a USG.
- The Dream Machine Pro steps run wpa_supplicant in a podman container, and current UniFi OS no longer has podman. Use On a GPON line instead.
- They use
eth10for the Dream Machine Pro’s SFP+ port; current UniFi OS calls iteth9.
The 2020 build used certificate files bought ready-made. Today, use your own gateway’s, as above.
With a UniFi Security Gateway
This is adapted from AntiTrust’s  guide on DSLReports. You’ll also need the IP address, username and password of your UniFi controller. The examples use
10.0.1.5 for the controller, 10.0.1.1 for the USG and admin for the username.
1. Copy wpa_supplicant to the USG
Download wpa_supplicant from the DSLReports forum, then copy it to a writable folder on the USG. scp sends files to another computer over SSH; sign in with your UniFi controller’s username and password.
# switch to the directory where you downloaded wpa_supplicant
$ cd /path/to/wpa_supplicant
# copy wpa_supplicant to the USG using SCP
$ scp ./wpa_supplicant admin@10.0.1.1:/config/scripts/post-config.d/
SSH into the USG with the same username and password (or  an SSH key), and move it into place.
$ ssh admin@10.0.1.1
# move wpa_supplicant to the right folder
$ sudo mv /config/scripts/post-config.d/wpa_supplicant /config/scripts/
2. Make it start on its own
Create a script that starts wpa_supplicant:
cd /config/scripts/post-config.d/
nano wpa_supplicant.sh
Paste this into the nano editor:
#!/usr/bin/env bash

# Start EAP-TLS on eth0
# Check if already running to avoid multiple instances
# Created by AntiTrust on DSLReports.com on May 15, 2019
# https://www.dslreports.com/forum/r32391619-

IF_WAN=eth0
PROCESS_NAME=wpa_supplicant
PROCESS_PATH=/config/scripts/wpa_supplicant
PROCESS_COUNT=$(ps -A | grep $PROCESS_NAME | egrep -v "grep|$(basename $0)" | grep -c $PROCESS_NAME)

if [ $PROCESS_COUNT = 0 ] && [ -x $PROCESS_PATH ]; then
  $PROCESS_PATH -s -B -Dwired -i$IF_WAN -c/config/scripts/wpa_supplicant.conf -g/var/run/wpa_supplicant.ctrl -P/var/run/wpa_supplicant.pid
fi
The USG’s WAN port is eth0; if yours is different, change IF_WAN. Press Ctrl-O, then Ctrl-X, to save and close. Then make both files executable:
$ chmod +x /config/scripts/wpa_supplicant
$ chmod +x /config/scripts/post-config.d/wpa_supplicant.sh
3. Copy the certificate files
On your own computer, copy the files to the USG:
# switch to the directory where you saved your files
$ cd /path/to/*.pem
# copy the PEM files to the USG using SCP
$ scp ./*.pem admin@10.0.1.1:/config/scripts/post-config.d/
# copy wpa_supplicant.conf to the USG using SCP
$ scp ./wpa_supplicant.conf admin@10.0.1.1:/config/scripts/post-config.d/
Then, in the SSH session on the USG, move them into place:
# move PEM files
$ sudo mv /config/scripts/post-config.d/*.pem /config/auth/
# make PEM files read-only
$ sudo chmod -R 0600 /config/auth
# move conf file
$ sudo mv /config/scripts/post-config.d/wpa_supplicant.conf /config/scripts/
4. Tag the WAN with VLAN 0
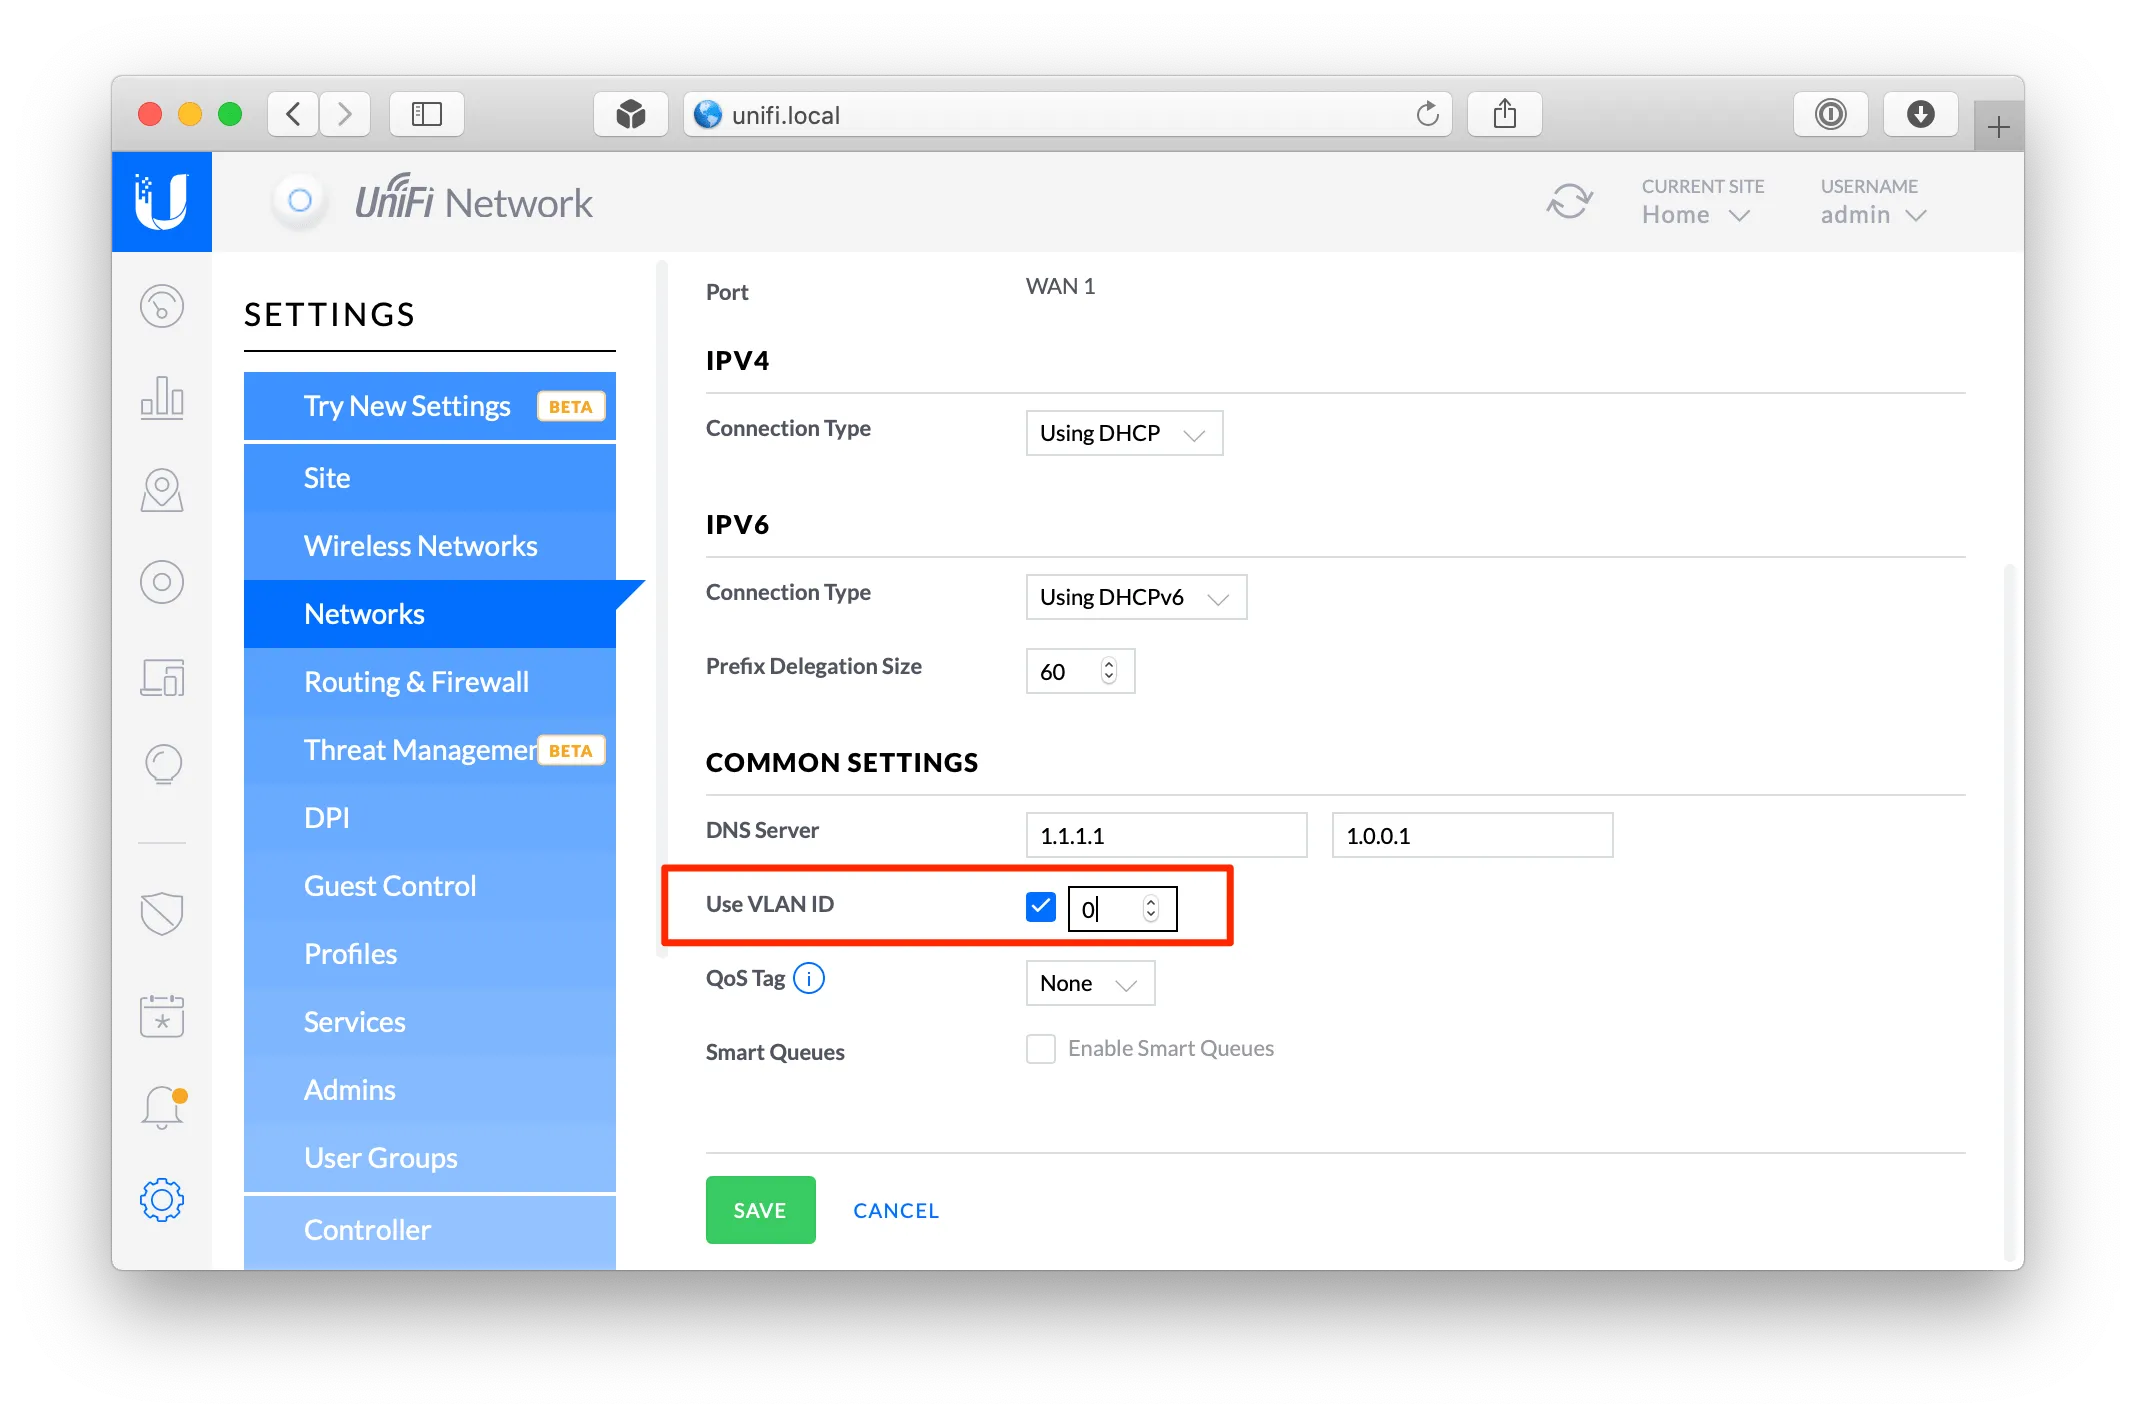
In the UniFi controller, go to Settings › Networks › WAN › Common Settings, turn on Use VLAN ID and set it to 0.
5. Give the USG the gateway’s MAC address
AT&T’s network has to see the RG’s MAC address. The controller’s web interface has no setting for it, so it goes in the controller’s config.gateway.json file:
$ ssh admin@10.0.1.5
$ cd /usr/lib/unifi/data/sites/default/
$ nano config.gateway.json
The file is normally empty. Paste this in, with the MAC address of your rooted gateway in place of the Xs:
{
	"interfaces": {
		"ethernet": {
			"eth0": {
				"mac": "XX:XX:XX:XX:XX:XX"
			}
		}
	}
}
Save and close with Ctrl-O and Ctrl-X, then give the file to the controller’s user:
$ chown unifi:unifi config.gateway.json6. Provision, and plug in the fiber
In the controller, go to Devices › USG › Config › Manage Device, and press Provision under Force Provision.
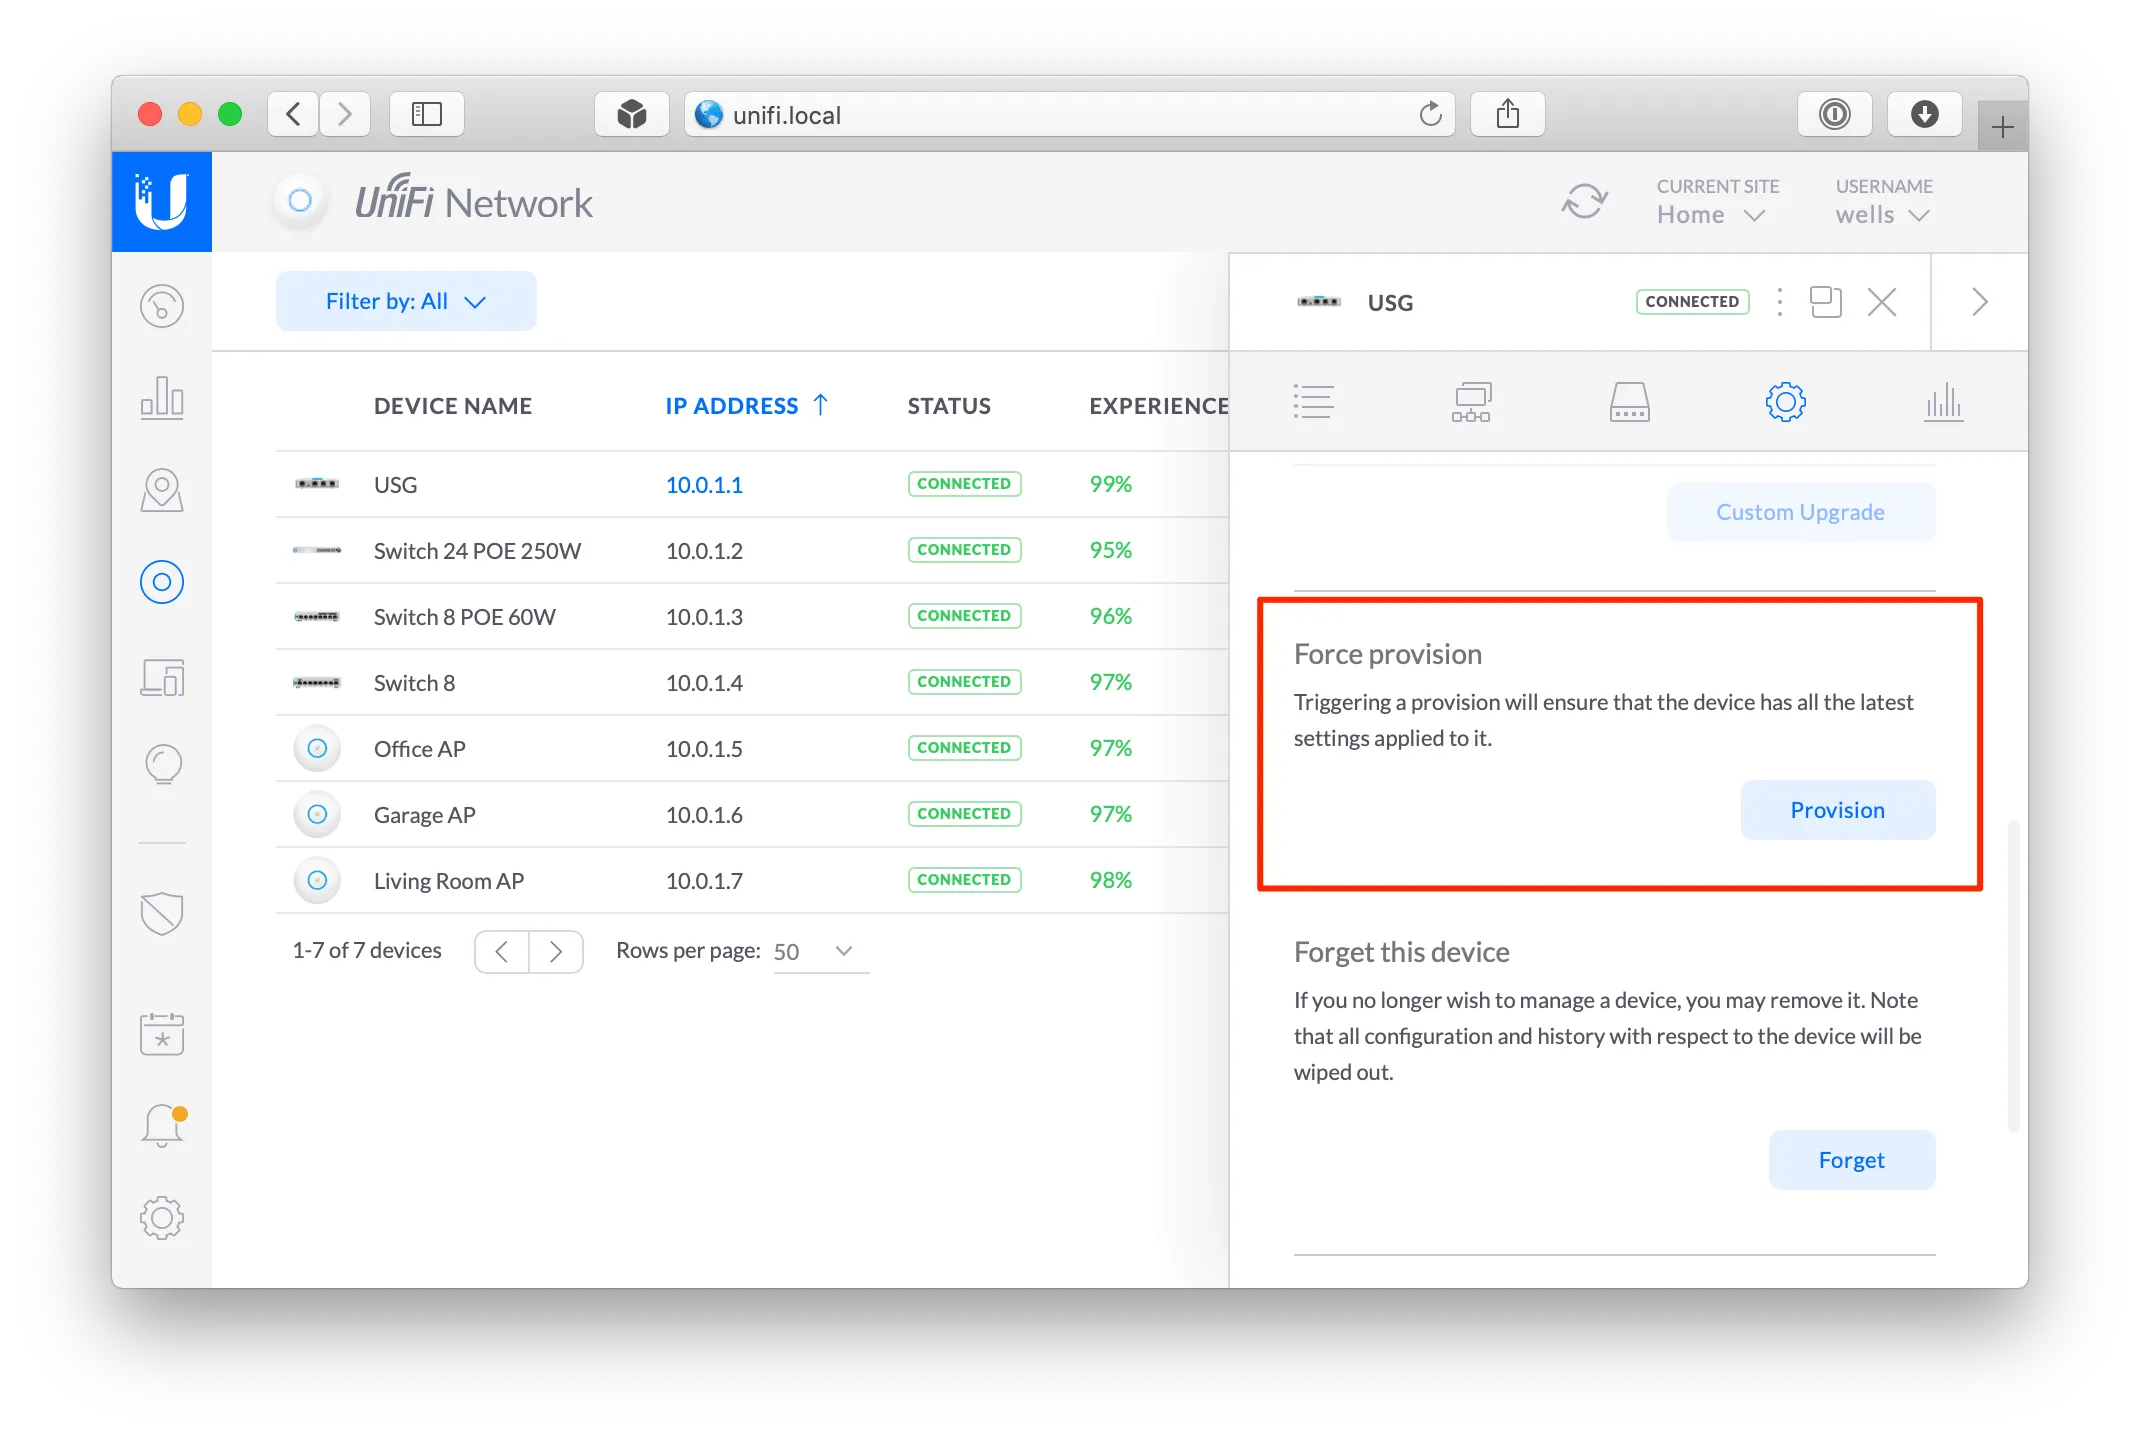
While it provisions, unplug the RG from the ONT and the USG, and plug the ONT’s Ethernet cable into the USG’s WAN port. After about five minutes, restart the USG by unplugging it and plugging it back in. Once it’s back, the internet should work.
To check, SSH into the USG and watch its log:
$ ssh admin@10.0.1.1 # the IP of your USG
$ tail -n 100 -f /var/log/messages | grep wpa_supplicant
Lines like these mean it signed in:
...
Mar  1 17:24:18 USG wpa_supplicant[5150]: eth0: CTRL-EVENT-EAP-PEER-CERT depth=0 subject='/C=US/ST=Michigan/L=Southfield/O=ATT Services Inc/OU=OCATS/CN=aut03pltnca.pltnca.sbcglobal.net' hash=XXXXXXXXXXXXXXXXXXXXXXXXXXXXXXXXXXXXXXXXXXXXXXXXXXXXXXXXXXXXXXXX
Mar  1 17:24:18 USG wpa_supplicant[5150]: eth0: CTRL-EVENT-EAP-PEER-ALT depth=0 DNS:aut03pltnca.pltnca.sbcglobal.net
Mar  1 17:24:57 USG wpa_supplicant[5150]: eth0: CTRL-EVENT-EAP-SUCCESS EAP authentication completed successfully
Mar  1 17:24:57 USG wpa_supplicant[5150]: eth0: CTRL-EVENT-CONNECTED - Connection to XX:XX:XX:XX:XX:XX completed [id=0 id_str=]
...
With a UniFi Dream Machine Pro
The Dream Machine Pro (UDM Pro) runs wpa_supplicant in a container, using pbrah’s wpa_supplicant-udmpro image. The examples use 192.168.1.1 for the UDM Pro.
1. Turn on SSH
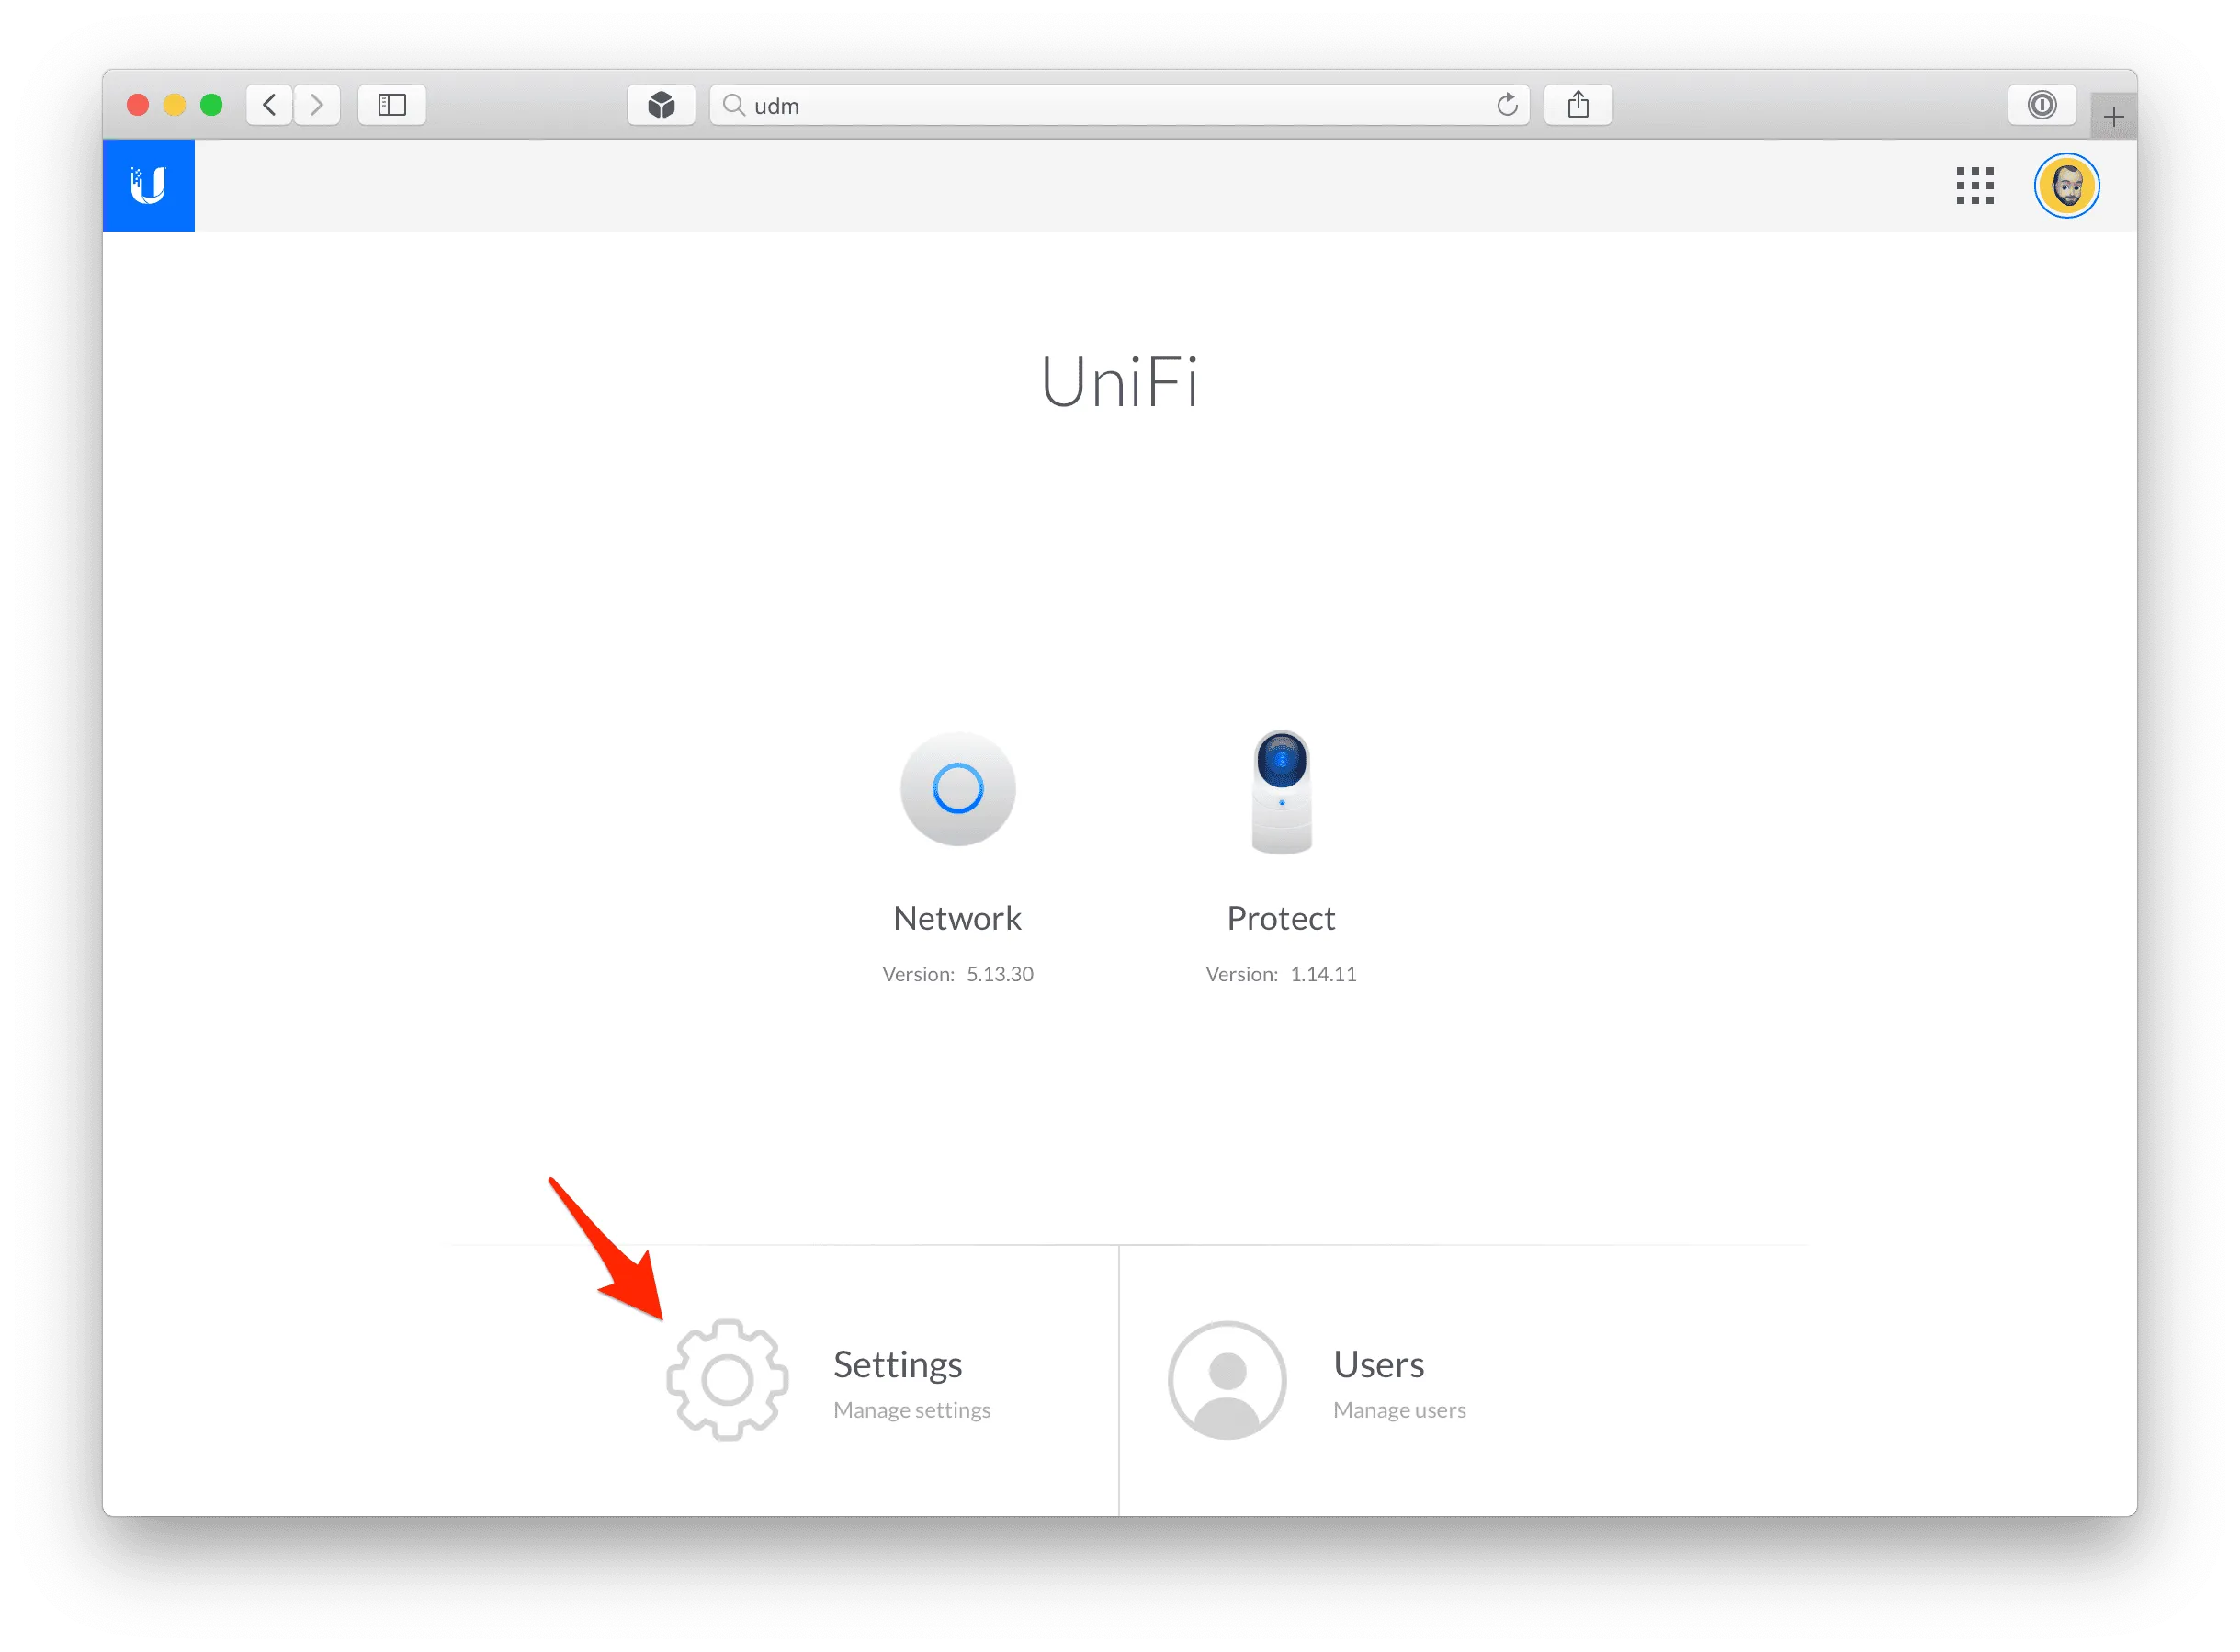
Open the UDM Pro’s address in a browser and go to Settings.
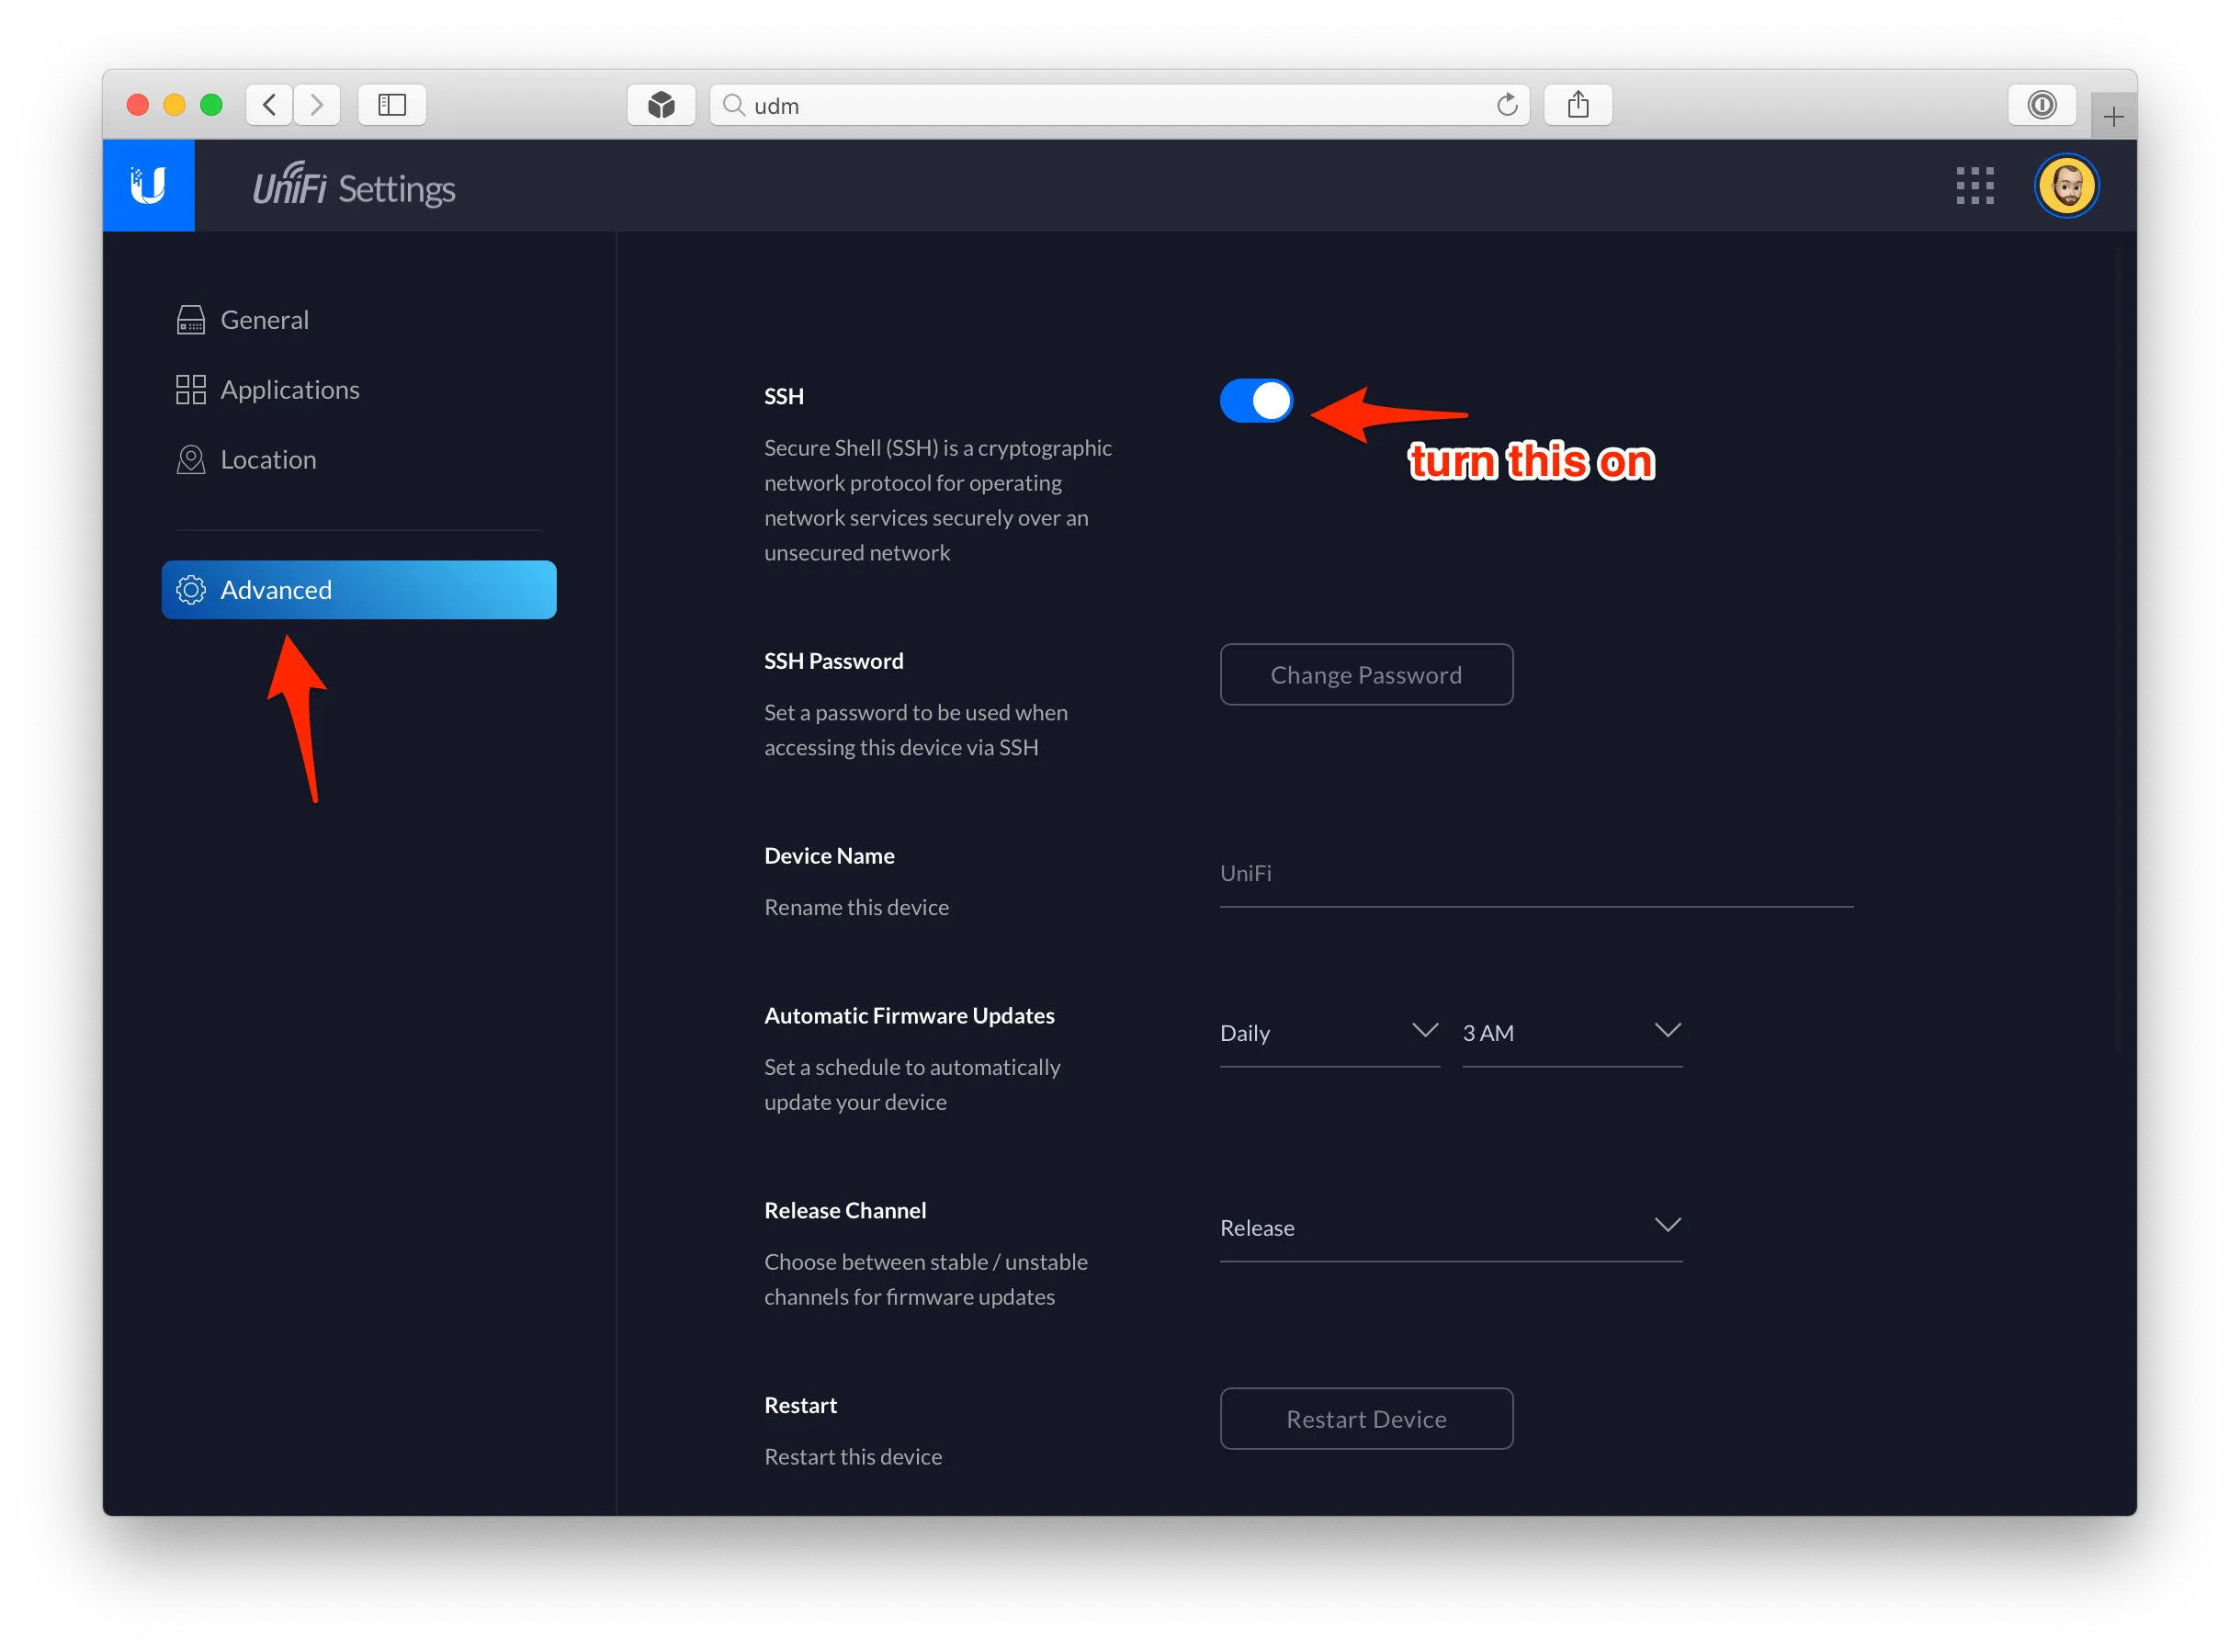
Under Advanced, turn on SSH, set an SSH password and press Confirm.
2. Copy the certificate files
Copy the four files to the UDM Pro. The username is root, and the password is the one you just set.
# switch to the directory where you saved your files
$ cd /path/to/*.pem
# copy the PEM files to the UDMP using SCP
$ scp ./*.pem root@192.168.1.1:/tmp/
# copy wpa_supplicant.conf to the UDMP using SCP
$ scp ./wpa_supplicant.conf root@192.168.1.1:/tmp/
SSH in and move them into place:
# ssh into the UDMP
$ ssh root@192.168.1.1
# create the certificate directory
mkdir /mnt/data/podman/wpa_supplicant/
# copy files into the new directory
$ cp -arfv /tmp/*pem /tmp/wpa_supplicant.conf /mnt/data/podman/wpa_supplicant/
3. Point the config at the certificates
These commands give wpa_supplicant.conf the full paths of the certificate files. Run each one only once:
$ sed -i 's,ca_cert=",ca_cert="/etc/wpa_supplicant/conf/,g' /mnt/data/podman/wpa_supplicant/wpa_supplicant.conf
$ sed -i 's,client_cert=",client_cert="/etc/wpa_supplicant/conf/,g' /mnt/data/podman/wpa_supplicant/wpa_supplicant.conf
$ sed -i 's,private_key=",private_key="/etc/wpa_supplicant/conf/,g' /mnt/data/podman/wpa_supplicant/wpa_supplicant.conf
4. Start the container
With the UDM Pro still online through the RG, and the RG plugged in to port 8 (the Ethernet WAN port, not the SFP+ port), run:
$ podman run --privileged --network=host --name=wpa_supplicant-udmpro -v /mnt/data/podman/wpa_supplicant/:/etc/wpa_supplicant/conf/ --log-driver=k8s-file --restart always -d -ti pbrah/wpa_supplicant-udmpro:v1.0 -Dwired -ieth8 -c/etc/wpa_supplicant/conf/wpa_supplicant.confIf the RG is plugged in to port 10 (the SFP+ WAN port) instead, run this one:
$ podman run --privileged --network=host --name=wpa_supplicant-udmpro -v /mnt/data/podman/wpa_supplicant/:/etc/wpa_supplicant/conf/ --log-driver=k8s-file --restart always -d -ti pbrah/wpa_supplicant-udmpro:v1.0 -Dwired -ieth10 -c/etc/wpa_supplicant/conf/wpa_supplicant.conf5. Start it after every restart
The container has to start again whenever the UDM Pro restarts. The UDM boot script does that. Install it:
# SSH into your UDM
$ ssh root@192.168.1.1
# start UniFi OS shell
$ unifi-os shell
# download udm-boot and install it
$ curl -L https://udm-boot.boostchicken.dev -o udm-boot_1.0.4_all.deb
$ dpkg -i udm-boot_1.0.4_all.deb
$ exit
Then create a small script for it to run:
$ nano /mnt/data/on_boot.d/10-wpa_supplicant.shPaste this in, then save and close with Ctrl-O and Ctrl-X:
#!/bin/sh

podman start wpa_supplicant-udmpro
And make it executable:
chmod +x /mnt/data/on_boot.d/10-wpa_supplicant.sh6. Restart, and plug in the fiber
Restart the UDM Pro and plug the ONT’s Ethernet cable straight into its WAN port. It takes a few minutes to start; then the internet should work. To check, SSH back in and watch the container’s log:
$ ssh root@192.168.1.1
$ podman logs -f wpa_supplicant-udmpro
Lines like these mean it signed in. Press Ctrl-C to stop watching.
...
eth8: CTRL-EVENT-EAP-PEER-CERT depth=0 subject='/C=US/ST=Michigan/L=Southfield/O=ATT Services Inc/OU=OCATS/CN=aut03pltnca.pltnca.sbcglobal.net' hash=XXXXXXXXXXXXXXXXXXXXXXXXXXXXXXXXXXXXXXXXXXXXXXXXXXXXXXXXXXXXXXXX
eth8: CTRL-EVENT-EAP-PEER-ALT depth=0 DNS:aut03pltnca.pltnca.sbcglobal.net
eth8: CTRL-EVENT-EAP-SUCCESS EAP authentication completed successfully
...
Thanks
- evie-lau’s Unifi-gateway-wpa-supplicant, which the GPON steps follow
- 0x888e/certs, for extracting a BGW210’s or BGW320’s certificate
- pon.wiki and the 8311 community, for the XGS-PON method
- AntiTrust’s guide on DSLReports, which the 2020 USG steps are adapted from, and the DSLReports thread that showed it works on a USG
- pbrah’s wpa_supplicant-udmpro and boostchicken’s udm-utilities, which the 2020 Dream Machine Pro steps are adapted from
- The guide to rooting the NVG510 and NVG589